Plant Overview
Known as the "original wheat," Einkorn (Triticum monococcum) is a living fossil from the dawn of agriculture. This Neolithic treasure was one of the very first crops ever domesticated in the Fertile Crescent nearly 10,000 years ago. Unlike modern wheat, which has been hybridized and changed by industrial farming, Einkorn remains genetically pure and unchanged since the Stone Age.
🔍 How to Identify
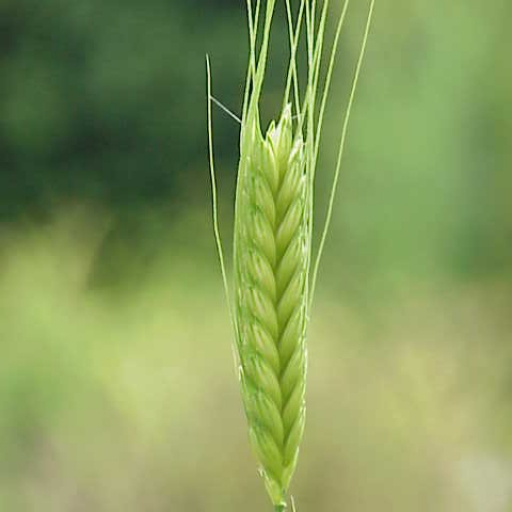
- 🌾 Single Grain Spikelets: The name monococcum literally means "single grain." Unlike modern wheat that packs multiple kernels into a cluster, Einkorn holds just one small, flat grain per spikelet.
- 🧔 The "Bearded" Look: The seed heads feature long, stiff, and straight bristles called awns. This gives the plant a distinctively combed or "hairy" appearance compared to more rounded grains.
- 📏 Slender Profile: The stalks are notably thinner and more delicate than modern bread wheat, often swaying gracefully in the wind. The grain itself is a deep golden-bronze color when mature.
🏡 In Your Garden
- 🏔️ Thrives in Poor Soil: Einkorn is the ultimate "survivor" crop. It was historically favored because it can grow in marginal, dry, or nutrient-poor soils where modern, pampered wheat varieties would fail.
- 🧥 The Protective Hull: One unique feature is its "hulled" nature. The kernels are tightly wrapped in a tough husk (glume) that stays attached even after threshing. While this makes it harder to mill into flour, it acts as a natural armor against pests, birds, and fungal diseases.
⚠️ Safety & Toxicity
- 🍞 Gluten Awareness: Einkorn contains a different type of gluten than modern wheat. While many people with minor sensitivities find it easier to digest, it is not safe for those with Celiac disease.
- 🐾 Pet Safety: The plant is generally non-toxic to dogs, cats, and horses. In fact, young Einkorn shoots are often used as high-quality "wheatgrass" for pet health.
✨ Fun Fact
When "Ötzi the Iceman," the famous 5,300-year-old mummy, was discovered preserved in an Alpine glacier, scientists analyzed his stomach contents and found that his final meal included grains of Einkorn wheat!

Detailed Care Instructions
To grow Triticum Monococcum, commonly known as einkorn wheat, follow these steps:
- Obtain einkorn wheat seeds: You can purchase einkorn wheat seeds from reputable seed companies or specialty grain suppliers. Make sure to get organic and untreated seeds for best results.
- Prepare the soil: Einkorn wheat prefers well-draining soil. Prepare your garden bed by removing any weeds or debris and loosening the soil with a garden fork or tiller. Add organic matter such as compost or well-rotted manure to improve soil fertility.
- Sow the seeds: Einkorn wheat is typically sown directly into the ground as it does not transplant well. Scatter the seeds evenly across the prepared bed, aiming for a density of around 20-30 seeds per square foot.
- Light and temperature requirements: Einkorn wheat requires full sun to grow properly. Ensure that the planting location receives at least 6-8 hours of direct sunlight daily. The ideal temperature range for einkorn wheat growth is between 60°F and 75°F (15°C and 24°C).
- Watering: Keep the soil consistently moist but not waterlogged. Water the planted area deeply immediately after sowing the seeds. After that, water regularly, providing approximately 1 inch of water per week. Adjust watering based on rainfall and soil moisture levels.
- Fertilization: Einkorn wheat has moderate nutrient requirements. If your soil is rich in organic matter, additional fertilization may not be necessary. However, you can side-dress the plants with compost or a balanced organic fertilizer halfway through the growing season if needed.
- Weed control: Regularly remove any weeds that compete with the einkorn wheat plants for nutrients and space. Weed diligently especially until the plants have fully established.
- Harvesting: Einkorn wheat is typically harvested when the seed heads turn golden and the stems have dried. Cut the wheat stalks at the base and bundle them together. Thresh the grain from the seed heads by beating or rubbing them to separate the seeds. Winnow the grain to remove any chaff.
Remember to check your local agricultural regulations and consult with experienced gardeners or agricultural experts for specific recommendations and techniques suited to your region.

Place in a bright room that is sun drenched almost all day. Or directly in a south-facing window.

To properly water Triticum Monococcum plants, it is important to first establish the watering needs of the plant. This can be done by observing the plant and assessing the soil moisture level. Triticum Monococcum plants typically prefer moist soil, but overwatering can lead to root rot and other problems.
When watering, it is best to avoid getting water on the leaves of the plant, as this can increase the risk of fungal infections. Instead, water at the base of the plant, using a gentle stream to ensure that the water is absorbed by the soil.
The frequency of watering will depend on a range of factors, including the climate, soil type, and plant size. It is generally recommended to water Triticum Monococcum plants when the top few inches of soil feel dry to the touch.
Overall, taking care to water Triticum Monococcum plants properly can help to ensure healthy growth and a robust crop yield.
For optimal growth and yield, apply a balanced fertilizer with nitrogen, phosphorus, and potassium in a ratio of 3:1:2. The fertilizer should be applied before planting or at the emergence of the first leaf. Avoid applying too much nitrogen as it can lead to excessive vegetative growth and reduced grain yield. It is also recommended to conduct a soil test to determine the specific fertilizer requirements for your soil type and growing conditions. Follow the manufacturer's instructions for application rates and frequency.
The most suitable soil for Triticum Monococcum would be a well-draining soil with a pH level of 6.0 to 7.5. The soil should be enriched with organic matter such as compost or aged manure to provide adequate nutrients for the plant. The soil should also retain moisture, but not be waterlogged, as Triticum Monococcum prefers moist soil. It is important to ensure that the soil is free of contaminants, such as pesticides and heavy metals, as these can be harmful to Triticum Monococcum. If growing in containers, a potting mix specifically designed for vegetables and herbs would be suitable. The soil should be adequately fertilized during the growing season to promote healthy growth and development of the plant.
To propagate this plant, first, select a healthy plant with strong roots and stems. Cut off a section of the stem, taking care not to damage the parent plant, and remove any leaves from the bottom of the cutting.
Next, dip the cut end of the stem into a rooting hormone to encourage the growth of new roots. Plant the stem cutting into a pot filled with moist, well-draining soil. Cover the pot with a plastic bag or clear plastic wrap to create a greenhouse effect and encourage the cutting to take root.
Place the pot in a warm and bright location but avoid direct sunlight. Keep the cutting moist but not wet by misting it regularly with water. After about 4-8 weeks, the cutting should start to root and new growth should appear.
Once the cutting has established roots, it can be transplanted into a larger pot or outdoor garden bed. Keep the plant well-watered and fertilize it regularly to encourage healthy growth. With care and attention, this plant can be propagated successfully and can provide beautiful foliage and edible grains.


