Plant Overview
Often called the Southern Japanese Hemlock, this elegant conifer is a staple of traditional Japanese temple gardens and misty mountain landscapes. It carries a sense of ancient serenity, featuring a broad, pyramidal crown and branches that sweep downward like the graceful eaves of a pagoda. Interestingly, this specific species is the namesake of its entire genus; "Tsuga" is the Japanese word for this very tree.
🔍 How to Identify
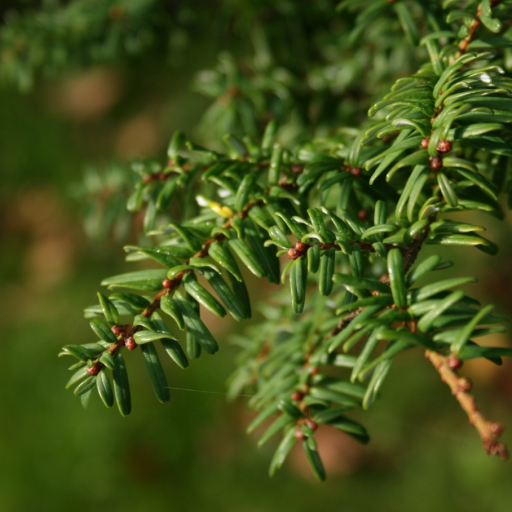
- 🌿 The Needles: The foliage consists of short, flat, glossy dark-green needles. If you look closely at the very tip of a needle, you’ll notice a tiny "notch" or cleft, which is a key way to tell it apart from other hemlocks.
- ⚪ The Underside: Flip a branch over to reveal two brilliant, silvery-white bands (stomatal bands). These give the tree a shimmering, bi-color appearance when the wind catches the canopy.
- 🌲 The Cones: It produces small, egg-shaped cones that are barely an inch long. They hang delicately from the tips of the branches like woody ornaments, maturing from a pale green to a warm cinnamon brown.
🏡 In Your Garden
- 🐢 A Lesson in Patience: This is an exceptionally slow-growing tree. Because of its disciplined growth rate and natural grace, it is a world-class candidate for large-scale bonsai or for use as a "specimen tree" in smaller urban gardens where space is at a premium.
- 🌦️ Humidity and Shelter: While it is more heat-tolerant than its North American cousins, it still craves "cool feet" and high humidity. It performs best when sheltered from harsh, drying winter winds, which can cause the needles to turn brown and drop.
- ⛰️ Soil Sensitivity: It prefers acidic, organic-rich soil that stays moist but never soggy. It has a sensitive, shallow root system that dislikes "wet feet," so ensure your garden spot has excellent drainage.
⚠️ Safety & Toxicity
- ✅ Safe Status: This tree is non-toxic to humans, cats, and dogs. It is a "friendly" conifer with soft needles that won't prick or scratch.
- 🚫 The Name Confusion: Do not confuse this tree with "Poison Hemlock" (Conium maculatum). That is a small, flowery weed in the carrot family that is famously deadly. The Tsuga tree is unrelated to the poison that killed Socrates and is perfectly safe to have around children and pets.
✨ Fun Fact
The species was named after Philipp Franz von Siebold, a 19th-century physician and botanist who lived on a tiny man-made island in Nagasaki. At the time, Japan was closed to foreigners, and Siebold had to smuggle many of his plant discoveries—including this hemlock—out of the country to share them with the Western world!

Detailed Care Instructions
To grow Tsuga Sieboldii, also known as the Japanese Hemlock, follow these steps:
- Choose the right location: Tsuga Sieboldii prefers a location with partial shade to full shade. It can tolerate some sunlight, but too much direct sunlight can damage the plant.
- Soil requirements: Tsuga Sieboldii prefers moist, well-draining soil that is rich in organic matter. Prepare the soil by adding compost or well-rotted manure to increase its fertility and drainage.
- Planting: Dig a hole in the prepared soil that is slightly larger than the root ball of the plant. Place the plant in the hole, making sure the top of the root ball is level with the surrounding ground. Backfill the hole with soil, gently firming it around the roots.
- Watering: Water the newly planted Tsuga Sieboldii thoroughly after planting. Keep the soil evenly moist but not waterlogged. Mulching around the plant can help retain moisture and keep the soil cool.
- Fertilization: Feed the plant with a slow-release, balanced fertilizer in spring or early summer. Follow the manufacturer's instructions for dosage and application.
- Pruning: Minimal pruning is generally required for Tsuga Sieboldii. However, you can lightly prune to remove any dead or damaged branches. Avoid heavy pruning, as the plant has a naturally attractive shape.
- Pest and disease control: Tsuga Sieboldii is generally pest and disease resistant. However, watch out for aphids, spider mites, and scale insects. Treat any infestations with insecticidal soap or neem oil.
- Winter protection: Tsuga Sieboldii is hardy in USDA zones 5-8. In colder regions, protect the plant from harsh winter conditions by mulching around the base and covering it with burlap or a frost blanket.
Remember, Tsuga Sieboldii is a slow-growing plant, so be patient with its growth. Provide proper care, and it will gradually develop into a beautiful addition to your garden.

Place in a bright room that is sun drenched almost all day. Or directly in a south-facing window.

To properly water this plant, it is important to understand its specific watering needs and preferences. This plant prefers consistently moist but well-draining soil, so it is important to water it thoroughly and deeply, allowing the soil to absorb as much moisture as possible. However, it is equally important to avoid overwatering, as this can lead to root rot and other issues.
To water this plant, begin by checking the soil moisture level. Stick your finger or a moisture meter into the soil to determine whether it is dry or moist. If it feels moist at a depth of one to two inches, wait to water the plant until the soil has dried out slightly. If the soil feels dry, it is time to water the plant.
When watering, use room temperature water and water the soil directly around the plant's base, rather than spraying the leaves or stems. Water until the soil is thoroughly saturated, and allow any excess water to drain away.
It is important to repeat this process regularly, as neglecting to water the plant can lead to stunted growth, wilted leaves, and other signs of stress. However, be mindful of not overwatering, and adjust the frequency of watering depending on factors such as season, temperature, and humidity. With proper care and attention, this plant can thrive and grow to its full potential.
To fertilize this plant, you should apply a balanced fertilizer with equal amounts of nitrogen, phosphorus, and potassium. Use a slow-release fertilizer once in the spring and again in the fall. Be sure to spread the fertilizer evenly around the base of the plant and water thoroughly after application. Avoid over-fertilizing, as this can damage the tree's root system. Monitor the tree's growth and adjust fertilization as needed based on visual cues.
When planting Tsuga Sieboldii, it is recommended to use well-draining soil that is rich in organic matter. The soil should have a slightly acidic pH level in the range of 5.5-6.5, and it should be able to retain moisture without becoming waterlogged. A good soil mixture could consist of a combination of peat moss, compost, and sand or perlite to provide both nutrients and proper drainage. It is also important to ensure that the soil is loose and friable, allowing for good root growth and oxygen penetration. Finally, it is recommended to add a layer of mulch to the top of the soil to help retain moisture and prevent weed growth.
To propagate this plant, you will need to take cuttings from healthy parent plants. Choose young stems that are still flexible and do not have any flower buds. Cut these stems at a 45-degree angle using a sharp clean blade.
Remove the lower leaves from the cutting and dip the cut end in a rooting hormone. Plant the cutting into moist soil, making sure to keep the soil constantly moist but not waterlogged.
Cover the cutting with a plastic bag to create a mini greenhouse and keep it in a shaded area for two to three weeks. After this time, check for root development by gently tugging the cutting. If it resists, roots have formed, and you can gradually expose the new plant to more sunlight.
After three to four weeks, the new plant should be ready to be transplanted into a larger pot or in its permanent location.
Common pests of the southern japanese hemlock include Scale insect, spider mites, aphids. Make a habit of checking your southern japanese hemlock frequently for pests so that any infestations can be caught and managed early.


