Plant Overview
Known as the "Late Tulip" or the "Star Tulip," Tulipa tarda is a botanical gem from the rocky sub-alpine slopes of Central Asia. Unlike the tall, temperamental tulips often found in formal bouquets, this miniature species is a rugged survivor that creates a stunning carpet of "fried egg" blooms. It is highly prized by gardeners for its ability to naturalize, meaning it will return and spread year after year rather than fading away after one season.
🔍 How to Identify
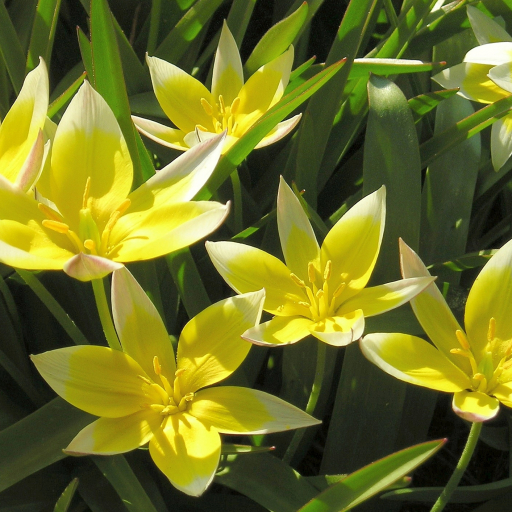
- 🌟 The "Star" Bloom: When the sun hits them, the flowers open wide into a six-pointed star shape, revealing a brilliant golden-yellow center fringed with snowy white tips.
- 🍃 Prostrate Foliage: The leaves are narrow, lance-shaped, and grow in a low rosette that hugs the ground, providing a lush green backdrop for the bright flowers.
- 📏 Compact Stature: This is a true dwarf tulip, rarely reaching more than 6 inches in height, with multiple flowers often blooming from a single stem.
🏡 In Your Garden
- 🪨 The Rock Garden Hero: Coming from stony habitats, this tulip thrives in gritty, well-draining soil. It is the perfect candidate for rockeries, gravel gardens, or the very front of a sunny border where taller plants won't shade it out.
- ⏳ Set It and Forget It: Unlike hybrid tulips that often need to be "lifted" and stored over winter, Tulipa tarda is happy to stay in the ground. It is remarkably cold-hardy and actually prefers to be left undisturbed so it can form a dense colony.
⚠️ Safety & Toxicity
- 🐾 Toxic to Pets: Like all members of the Lily family, tulips contain tuliposides. If ingested by dogs, cats, or horses, it can cause drooling, vomiting, and digestive upset.
- 🧤 Skin Sensitivity: The bulbs contain the highest concentration of toxins. Some gardeners may experience "tulip fingers"—a mild itchy rash or dermatitis—when handling the bulbs, so wearing gloves is recommended during planting.
✨ Fun Fact
- 🏆 This tiny tulip is so reliable and beautiful that it earned the prestigious Award of Garden Merit from the Royal Horticultural Society. While most modern tulips are the result of intense human breeding, Tulipa tarda remains virtually identical to the wild versions found growing in the mountains of Kyrgyzstan.

Detailed Care Instructions
To grow Tulipa Tarda plants, here are some steps you can follow:
- Choosing the right location: Tulipa Tarda plants prefer full sunlight but can tolerate partial shade. Select a well-drained area with fertile soil.
- Planting time: Plant the bulbs in the autumn season, around 4-6 weeks before the ground freezes. This timing allows the bulbs to establish their root systems before winter.
- Soil preparation: Make sure the soil is loose and well-drained. Tulipa Tarda prefers slightly acidic to neutral soil. You can add organic matter or compost to improve the soil quality if needed.
- Planting method: Dig a hole 4-6 inches deep, or about three times the size of the bulb. Place the bulb in the hole with the pointed end facing upwards. Space the bulbs 4-6 inches apart to allow them to spread and multiply.
- Watering: After planting, water the bulbs thoroughly to settle the soil and encourage root growth. However, avoid overwatering, as excessive moisture can cause the bulbs to rot.
- Mulching: Apply a layer of mulch around the planted area to help retain moisture, suppress weed growth, and protect the bulbs during winter.
- Maintenance: Tulipa Tarda requires minimal maintenance. Water the plants during dry spells, but try to avoid excessive moisture. Remove any weeds that may appear around the bulbs. After the flowers bloom, allow the foliage to wither and brown naturally before removing them. This allows the plant to store energy in the bulb for the following year.
- Propagation: Tulipa Tarda typically multiplies and spreads over time. After a few years, you can dig up the clumps in the autumn season, separate the small daughter bulbs, and replant them individually.
Remember to check your specific regional planting recommendations, as climate and soil conditions can vary. Tulipa Tarda plants can provide beautiful spring blooms with proper care and maintenance.

Place in a bright room that is sun drenched almost all day. Or directly in a south-facing window.

To water this type of plant, you should first wait until the top layer of soil is dry to the touch. Then, slowly and gently water around the base of the plant, trying not to get water on the leaves or flowers. Be sure not to over-water, as this can lead to root rot. It is also important to ensure that the soil has adequate drainage and is not sitting in standing water.
To fertilize this plant, you should first prepare the soil by loosening it with a hoe or garden fork. Then, apply a balanced fertilizer with equal amounts of nitrogen, phosphorous, and potassium. Follow the instructions on the fertilizer packaging to ensure you apply the correct amount.
It is best to apply the fertilizer in the early spring before the flowers appear and again in the fall after the flowers have died back. Be sure to water the plant thoroughly after applying the fertilizer to help it absorb the nutrients.
Avoid over-fertilizing the plant as this can lead to excessive growth and reduced flower production. Always follow the recommended dosage and frequency on the fertilizer packaging.
The best type of soil to use for the Tulipa Tarda plant is a well-draining soil that is slightly acidic. It should be a light and sandy soil with a pH of around 5 to 7.5. The soil should also be rich in nutrients and organic matter, such as compost or well-rotted manure. Avoid using heavy clay soils or soils with high levels of lime, as this can cause root rot or inhibits the uptake of iron by the plant.
To propagate this plant, you will need to follow a few simple steps.
First, select a healthy parent plant that is growing well and has good genetics.
Next, wait until the parent plant begins to produce offsets or side shoots. These are small plants that grow from the base of the parent plant.
Once the offsets are large enough, carefully remove them from the parent plant, taking care not to damage the roots.
Plant the offsets in a well-draining soil mixture, with the top of the bulb or root just below the surface of the soil. Water the newly planted offsets thoroughly, and place them in a location with bright, indirect light.
It is important to keep the soil evenly moist, but not waterlogged, as excess water can cause the bulbs to rot.
With proper care, the newly planted offsets should begin to establish themselves and grow into healthy new plants.
Common pests of the late tulip include Aphids, snails. Make a habit of checking your late tulip frequently for pests so that any infestations can be caught and managed early.


