Plant Overview
Known as the "American Stinging Nettle," Urtica gracilis is a plant that commands respect from every hiker and gardener. Often dismissed as a mere weed, this native North American perennial has a rich history as both a superfood and a source of textile fiber. It is a plant of contradictions: painful to the touch, yet incredibly nourishing once tamed by heat.
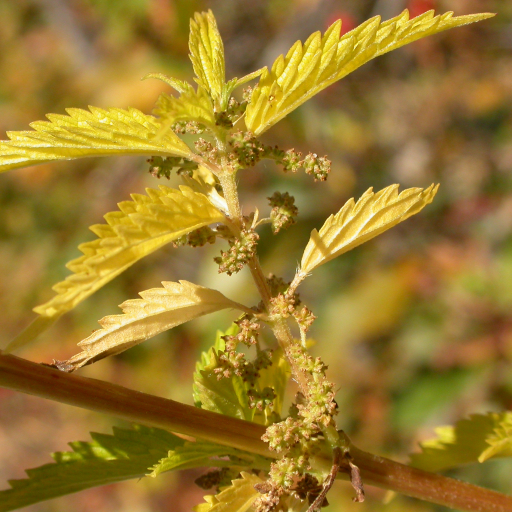
🔍 How to Identify
- 🍃 The Leaves: Look for lance-shaped, deeply serrated (toothed) leaves that grow in opposite pairs along a square-ish stem.
- 🪡 The Trichomes: The most distinct feature is the covering of fine, hollow hairs. These act like tiny hypodermic needles, ready to inject a stinging cocktail of formic acid if brushed against.
- 🌾 The Flowers: In mid-to-late summer, it produces drooping, greenish-white flower clusters that emerge from the "axils" where the leaves meet the stem.
🏡 In Your Garden
- 🌱 Nitrogen Lover: This plant is a "bio-indicator." If you see it thriving, it means your soil is exceptionally rich in nitrogen and organic matter.
- 🦋 Wildlife Sanctuary: While humans avoid it, several beautiful butterflies, including the Red Admiral and the Question Mark butterfly, rely on this plant as the primary food source for their caterpillars.
- 🚜 Management: Because it spreads via vigorous underground rhizomes, it can quickly dominate a garden bed. If you want to keep it for its medicinal or culinary uses, it is best grown in a large sunken pot or a dedicated "wild" corner.
⚠️ Safety & Toxicity
- 🚫 The Sting: Touching the raw plant causes "urticaria"—a burning, itchy rash that can last for several hours. Use thick gloves when handling.
- 🐕 Pets and Kids: Keep curious pets and children away from nettle patches. The sting is just as painful for dogs and cats as it is for humans.
- 🍳 Safe Consumption: The plant is edible and highly nutritious (rich in Iron and Vitamin A), but it must be boiled, steamed, or dried first. These processes collapse the stinging hairs and make the plant safe to eat.
✨ Fun Fact
- 🧵 Ancient Fabric: Nettle fibers are incredibly strong and were used for centuries to make everything from fishing nets to fine lace. During World War I, when cotton was in short supply, Germany used stinging nettles to manufacture army uniforms!

Detailed Care Instructions
Growing Urtica gracilis, commonly known as slender nettle, can be a rewarding process if you provide the right conditions. Here’s a step-by-step guide to help you grow this plant successfully:
1. Site Selection
- Choose the Right Location: Slender nettle prefers partially shaded locations but can tolerate full sun. It naturally grows in moist, rich soil often found in meadows, along streams, and in forested areas.
- Protection: Since the plant has stinging trichomes, place it in a location where it won’t accidentally be touched.
2. Soil Preparation
- Soil Type: Urtica gracilis thrives in well-drained, fertile soil. If your soil is poor, consider enriching it with compost or organic matter.
- pH Level: It prefers slightly acidic to neutral soil (pH 6.0-7.0).
3. Planting Seeds
- Seed Source: Obtain seeds from a reputable supplier or online.
- Sowing Seeds: Sow the seeds directly into the ground in the spring after the last frost, or start them indoors 4-6 weeks before the last expected frost.
- Direct Sowing: Scatter the seeds on the soil surface and lightly press them in, as they need light to germinate.
- Indoor Sowing: Use seed trays with a light soil mix, lightly press seeds into the soil surface, and keep them moist.
- Direct Sowing: Scatter the seeds on the soil surface and lightly press them in, as they need light to germinate.
- Germination: Maintain soil moisture until germination, which typically occurs within 10-14 days.
4. Transplanting (If Started Indoors)
- Hardening Off: Gradually acclimate indoor seedlings to outdoor conditions over about a week.
- Planting Out: Once seedlings are hardened off and the danger of frost has passed, transplant them into the garden, spacing them about 12-18 inches apart.
5. Care and Maintenance
- Watering: Keep the soil consistently moist but not waterlogged. Mulching can help retain soil moisture.
- Fertilization: Generally, Urtica gracilis doesn’t require much fertilization if planted in rich soil. However, if needed, you can use a balanced, organic fertilizer.
- Weeding: Keep the area around the plants weed-free to reduce competition for nutrients and water.
6. Harvesting
- Timing: Slender nettle can be harvested once it reaches a good size, usually in late spring to early summer.
- Precautions: Wear gloves and protective clothing to avoid stings. Cut young shoots and leaves with scissors or pruning shears.
- Usage: Nettle can be used fresh for teas, soups, and other culinary uses or dried for later use.
7. Pest and Disease Control
- Urtica gracilis is generally resistant to pests and diseases. Monitor for any signs of trouble, such as aphids or fungal issues, and treat accordingly.
8. Propagation
- Division: Apart from seeds, nettle can also be propagated by division in the spring or fall. Carefully dig up and divide the root clumps, then replant them.
By following these steps, you can effectively grow Urtica gracilis and enjoy the numerous benefits it offers, from its edible and medicinal uses to its role in supporting beneficial insects in your garden.
Urtica gracilis, a type of perennial herbaceous plant in the Urticaceae family, has specific watering needs to ensure its healthy growth. Here are detailed instructions on how to water it properly:
Watering Guidelines:
- Soil Moisture:
- Maintain evenly moist soil. Urtica gracilis prefers soil that is consistently damp but not waterlogged.
- Check the top inch (2.5 cm) of soil with your finger to ensure it is slightly moist. If it feels dry, it’s time to water.
- Maintain evenly moist soil. Urtica gracilis prefers soil that is consistently damp but not waterlogged.
- Watering Frequency:
- During the growing season (spring and summer), water regularly to keep the soil moist.
- In cooler months (fall and winter), reduce the frequency of watering as the plant’s growth slows and it requires less water.
- During the growing season (spring and summer), water regularly to keep the soil moist.
- Watering Method:
- Deep watering is recommended. Apply water at the base of the plant until the soil is saturated to a depth of at least 6 inches (15 cm).
- Avoid overhead watering to prevent moisture from accumulating on the foliage, which can lead to fungal diseases.
- Deep watering is recommended. Apply water at the base of the plant until the soil is saturated to a depth of at least 6 inches (15 cm).
- Container Plants:
- For potted Urtica gracilis, ensure the pot has drainage holes to prevent water from stagnating at the bottom.
- When the surface of the potting mix dries out, water thoroughly until it drains from the bottom.
- For potted Urtica gracilis, ensure the pot has drainage holes to prevent water from stagnating at the bottom.
- Environmental Considerations:
- Be mindful of the surrounding environment and climate. During hot, dry periods, you may need to water more frequently.
- In natural or garden settings, mulching around the base of the plant can help retain soil moisture and reduce the need for frequent watering.
- Be mindful of the surrounding environment and climate. During hot, dry periods, you may need to water more frequently.
- Signs of Improper Watering:
- Overwatering: Yellowing leaves, wilting despite moist soil, and root rot can indicate too much water.
- Underwatering: Wilting leaves, dry soil, and stunted growth may indicate the plant needs more water.
Tips for Optimal Watering:
- Overwatering: Yellowing leaves, wilting despite moist soil, and root rot can indicate too much water.
- Use rainwater or distilled water if possible, as Urtica gracilis can be sensitive to high levels of chlorine and fluoride found in tap water.
- Water in the morning to allow excess moisture on the foliage to evaporate during the day, reducing the risk of fungal issues.
- Adjust your watering schedule according to the rainfall and humidity levels in your area.
By following these guidelines, you can help ensure that your Urtica gracilis remains healthy and vigorous throughout its growing season.
For your Urtica gracilis plant, here are some fertilizing instructions:
- Soil Preparation: Ensure that the soil is well-draining and rich in organic matter. You can mix in some compost before planting to provide a nutrient-rich environment.
- Fertilizer Type: Use a balanced, all-purpose fertilizer with an N-P-K ratio of approximately 10-10-10. This indicates a balanced mix of nitrogen (N), phosphorus (P), and potassium (K), which can promote healthy growth.
- Timing:
- Early Spring: Apply a slow-release granular fertilizer as the plant begins to show new growth. This will help support its initial growth phase.
- Mid-Summer: You can apply another round of balanced fertilizer to support continued growth and health.
- Early Spring: Apply a slow-release granular fertilizer as the plant begins to show new growth. This will help support its initial growth phase.
- Application:
- Granular Fertilizer: Scatter the granules evenly around the base of the plant, but avoid direct contact with the stems and leaves. Lightly work the granules into the top few inches of soil and water well afterward.
- Liquid Fertilizer: If you prefer a liquid form, dilute it according to the package instructions and apply it to the soil around the base of the plant.
- Granular Fertilizer: Scatter the granules evenly around the base of the plant, but avoid direct contact with the stems and leaves. Lightly work the granules into the top few inches of soil and water well afterward.
- Compost and Mulch: In addition to chemical fertilizers, applying a layer of compost or well-rotted manure around the base can provide additional nutrients and improve soil structure. A layer of mulch can help retain moisture and regulate soil temperature.
- Avoid Over-Fertilizing: Too much fertilizer can lead to excessive leafy growth at the expense of root development. Follow the recommended dosage on your fertilizer package, and monitor your plant’s response. If you notice yellowing leaves or poor growth, it may actually be a sign of over-fertilization or nutrient imbalance.
- Watering: Make sure the plant receives adequate water, especially after fertilization, to help the nutrients reach the roots. Maintain consistent moisture but avoid waterlogging.
By following these guidelines, you can ensure that your Urtica gracilis plant receives the proper nutrients it needs to thrive.
Urtica gracilis thrives best in rich, fertile soil that is well-draining yet capable of retaining some moisture. Here are some detailed requirements for the soil to foster optimal growth:
- Soil Type: Loamy soil works best due to its balanced mixture of sand, silt, and clay. This type of soil provides good aeration and drainage while retaining necessary moisture and nutrients.
- pH Level: The soil should be slightly acidic to neutral, with a pH range of 6.0 to 7.0. This pH range enables the plant to assimilate nutrients effectively.
- Organic Matter: High levels of organic matter, such as compost or well-rotted manure, should be mixed into the soil. This not only improves the soil structure but also boosts its nutrient content, which is essential for vigorous growth.
- Drainage: Ensure the soil has excellent drainage properties to prevent waterlogging, which can lead to root rot. Adding perlite or coarse sand can enhance drainage in heavier soils.
- Moisture Retention: While good drainage is crucial, the soil should also be capable of holding onto some moisture, as the plant prefers consistently moist conditions. Mulching around the base can help retain soil moisture.
- Nutrient-Rich: Supplement the soil with balanced fertilizer or organic amendments to supply necessary nutrients, particularly nitrogen, which supports the lush, green foliage typical of this plant.
By adhering to these soil requirements, you can ensure healthy and robust growth for Urtica gracilis.
Urtica gracilis, a perennial herbaceous plant, can be propagated effectively through both seeds and vegetative methods. Here’s a step-by-step guide focusing on each method:
1. Propagation by Seed:
a. Harvesting Seeds:
- Collect seeds from the plant in late summer or early autumn when the seed heads have matured and turned brown.
- Shake the seeds into a paper bag or collect them by hand.
b. Seed Preparation: - Clean the seeds by removing any debris and plant matter.
- Allow the seeds to dry for a day or two in a well-ventilated area.
c. Sowing: - Prepare a seed tray or pots with a mix of well-draining soil, rich in organic matter.
- Sow the seeds on the surface of the soil, pressing them lightly without covering them, as they need light to germinate.
- Mist the soil gently to keep it moist but not waterlogged.
d. Germination: - Place the tray or pots in a location with indirect sunlight.
- Maintain consistent moisture using a mister to avoid displacing the seeds.
- Germination usually occurs within 2-4 weeks, depending on the temperature and moisture levels.
e. Transplanting: - Once the seedlings have developed a set of true leaves, they can be transplanted to individual pots or directly into the garden.
- Choose a location with partial shade to full sun and well-drained soil.
- Space the plants approximately 12-18 inches apart to allow for growth.
2. Propagation by Rhizomes:
a. Rhizome Division: - The best time to divide rhizomes is in early spring or late autumn.
- Carefully dig around the plant to expose the rhizomes below the soil surface.
b. Cutting and Preparation: - Use a sharp knife or spade to cut sections of the rhizome, ensuring each section has at least one or two growth buds.
- Plant the rhizome sections in pots filled with a mixture of garden soil and compost, or directly into prepared garden beds.
c. Planting: - Place the rhizomes horizontally in the soil, about 1-2 inches deep.
- Cover with soil and water lightly.
d. Establishment: - Keep the soil consistently moist but not waterlogged until new growth appears.
- Once established, the plants can be watered as required, typically when the soil begins to dry out.
3. Propagation by Stem Cuttings:
a. Cutting Selection: - Choose healthy, non-flowering stems during the growing season, preferably in spring or early summer.
- Cut a 4-6 inch section from the stem.
b. Preparing the Cuttings: - Remove the lower leaves, leaving only a few at the top.
- Dip the cut end into rooting hormone powder to encourage root development (optional but recommended).
c. Planting: - Insert the stem cuttings into a pot filled with a mixture of sand and peat or a well-draining potting mix.
- Water the soil to keep it moist, and place the pot in an area with indirect sunlight.
d. Rooting and Transplanting: - Roots should develop in a few weeks, at which point the cuttings can be transplanted to larger pots or directly into the garden.
By adhering to these detailed steps, you can successfully propagate Urtica gracilis and contribute to its growth in your garden or cultivation area.


