Plant Overview
Known as the "Queen of Orchids," the Vanda is a show-stopper that seems to defy gravity. These tropical beauties are often seen dangling in mid-air, showcasing long, snake-like roots and massive, fragrant blooms that can last for weeks. In Southeast Asia, they are cherished symbols of elegance and are frequently used in high-end floral displays and traditional ceremonies.
🔍 How to Identify
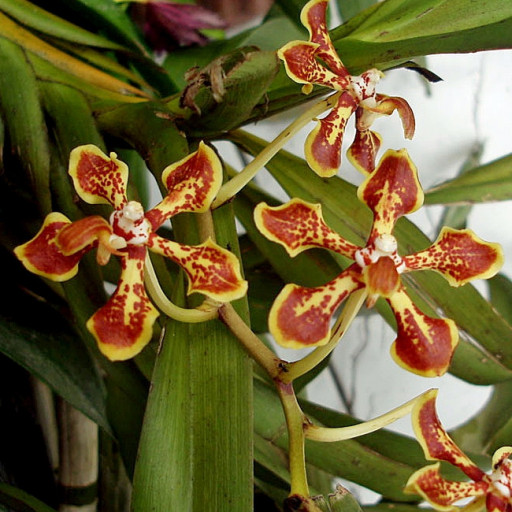
- 🌸 The Blooms: Large, flat, and often patterned flowers that come in nearly every color of the rainbow, including the rare and highly coveted "true blue."
- 🌿 Growth Habit: They grow vertically (monopodial) with stiff, leathery, strap-shaped leaves that sprout in two neat rows along a single central stem.
- 🧶 Aerial Roots: Thick, silvery-grey roots that hang freely in the air; these are covered in a spongy layer called velamen that drinks moisture directly from the atmosphere.
🏡 In Your Garden
- 💨 Air Over Soil: Vandas are true epiphytes that hate being buried in traditional potting soil. They thrive best in open "slat baskets" or simply hanging by a wire, as their roots require constant airflow to prevent suffocating.
- ☀️ The Light Lovers: Unlike the common Moth Orchid (Phalaenopsis), Vandas are sun-worshippers. They need very bright, filtered light and a daily "shower" or misting to mimic the heavy tropical rainstorms of their native habitat.
⚠️ Safety & Toxicity
- 🐾 Pet Friendly: Vandas are generally considered non-toxic to cats, dogs, and horses, making them a safe choice for a pet-filled home.
- 👶 Safe for Families: They are not known to be poisonous to humans, though it is always best to keep any plant out of reach of curious toddlers to avoid accidental choking hazards or skin irritation from sap.
✨ Fun Fact
The Vanda coerulea is one of the very few plants in the entire world that naturally produces a true blue pigment without any human or genetic intervention, making it a "holy grail" for orchid collectors and breeders.

Detailed Care Instructions
| Humidity | High |
| Lighting | Part Sun |
| Difficulty | Medium |
| Temperature | 16°C - 23°C |
| Hardiness Zones | 11A - 13B |
To grow Vanda plants, follow these steps:
- Choose a suitable location: Vanda plants need bright, indirect sunlight to thrive. Find a spot with filtered sunlight or shade during the hottest part of the day.
- Optimal temperature and humidity: Vandas prefer a warm and humid environment. Maintain temperatures around 70-85°F (21-29°C) during the day and above 60°F (15°C) at night. Humidity levels around 50-70% are best.
- Potting medium: Vanda orchids are epiphytes, meaning they prefer to grow without soil. Use a well-draining potting medium like orchid bark, sphagnum moss, or a combination of the two. Avoid using regular potting soil.
- Container and watering: Vandas are typically grown in hanging baskets or slatted wooden baskets to provide excellent drainage. Water the plant thoroughly when the roots appear silvery-gray and only slightly damp. Do not let the roots dry out completely.
- Water quality: Vanda orchids prefer rainwater or distilled water due to their sensitivity to chemicals and minerals in tap water. If using tap water, let it sit out overnight to evaporate chlorine before using.
- Fertilizing: Feed the Vanda every two weeks with a balanced fertilizer specifically formulated for orchids. Dilute the fertilizer to half its recommended strength.
- Air circulation: Good air circulation is crucial for Vanda orchids as it helps prevent rot and encourages healthy growth. Use fans or open windows to ensure proper ventilation.
- Repotting: Repot Vandas every one to two years or when the potting medium starts to break down. Remove any dead or decaying roots and replant in fresh, well-draining medium.
- Pests and diseases: Keep an eye out for common orchid pests such as aphids, mealybugs, and scale insects. Treat infestations promptly with organic insecticides or by manually removing the pests.
- Patience and care: Growing Vanda orchids can be challenging, but with patience and consistent care, they can thrive. Monitor the plant regularly and make necessary adjustments in watering, lighting, and humidity levels as needed.
Remember that each Vanda plant is unique, so it may take some trial and error to find the perfect conditions for your specific plant.

Place in a window with dappled sun or a spot in the middle of a room. Or directly in a window facing west or east.

Vanda plants should be watered regularly, but be careful not to overwater them. The best way to water them is to soak the roots in water for 5-10 minutes, then let the excess water drain away. This should be done every 5-7 days, or whenever the top layer of the growing medium feels dry to the touch. It is important to use distilled or rainwater for watering, as tap water can contain minerals that can harm the plant over time. Additionally, make sure to not wet the leaves while watering the plant, as this can lead to bacterial or fungal infections.
- Choose a balanced fertilizer that is specifically formulated for orchids.
- Dilute the fertilizer according to the package instructions.
- Apply the fertilizer to the soil or growing medium of the Vanda plant.
- Water the plant immediately after fertilizing to ensure the fertilizer reaches the roots.
- Fertilize the plant once a month during the growing season.
- Avoid fertilizing the plant during the dormant season or during periods of stress, such as after repotting or if the plant is experiencing disease or pest problems.
- Monitor the plant for any signs of over-fertilization, such as wilting, yellowing leaves, or stunted growth, and adjust the amount or frequency of fertilization accordingly.
The soil that is best suited for Vanda plants is a mixture that has good drainage and aeration properties. It should be able to retain moisture while allowing excess moisture to drain away quickly. This kind of soil is typically a combination of peat moss, pine bark, and perlite or vermiculite. The composition of the soil should also be slightly acidic, with a pH between 5.5 and 6.5. Care should be taken to avoid the use of heavy or dense soils, as they can retain too much moisture and lead to root rot. The ideal soil for Vanda plants should provide a loose and well-aerated environment that allows roots to grow freely and absorb nutrients efficiently.
There are several ways to propagate ### plant, and one of the most common methods is by using stem cuttings. To do this, you will need to select a healthy stem that has at least 2 or 3 aerial roots growing from it. Using a sharp knife or pair of scissors, carefully cut the stem into sections that are about 4-6 inches long.
Next, you will need to prepare a pot or container to plant the cuttings in. Fill the container with a well-draining potting mix that is rich in organic matter and has good air circulation. Moisten the soil lightly, but avoid overwatering as this can cause the stem cuttings to rot.
Once your container is ready, place the stem cuttings into the soil, making sure that at least one aerial root is buried in the soil. Cover the container with a plastic bag or dome to create a humid environment that will help the cuttings root. Place the container in a bright, warm location, but out of direct sunlight.
After about 2-3 weeks, you should start to see new growth emerging from the stem cuttings. At this point, you can remove the plastic cover and start to slowly acclimate the young plants to their new environment. Be sure to water them regularly, but avoid overwatering as this can cause root rot.
Over time, your stem cuttings should grow into healthy, mature plants that are ready to be planted in their permanent location. With proper care and attention, your ### plant will thrive and produce beautiful blooms for years to come.
Common pests of the vanda orchid include Scale insect, mealybugs, spider mites, thrips. Make a habit of checking your vanda orchid frequently for pests so that any infestations can be caught and managed early.


