Plant Overview
Often called "The Queen of Vanilla," Vanilla tahitensis is the rarest and most aromatic of the vanilla-producing orchids. While most commercial vanilla comes from its cousin in Madagascar, this Tahitian variety is prized by gourmet pastry chefs for its unique notes of cherry, licorice, and floral musk. It is a true tropical voyager, originating as a natural hybrid that found its paradise in the volcanic soil of the South Pacific.
🔍 How to Identify
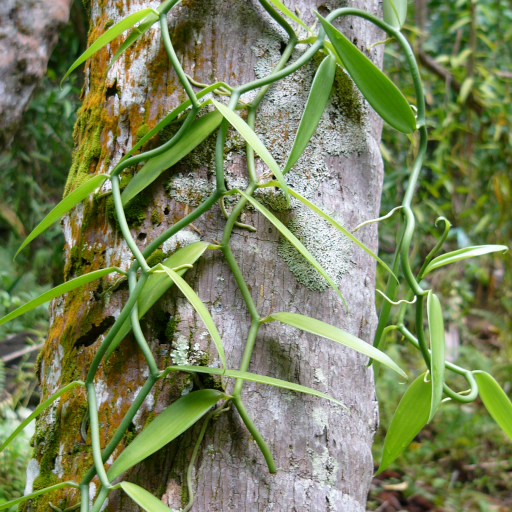
- 🌿 The Vine: A vigorous, climbing orchid with thick, succulent stems that can reach incredible lengths if given a tropical "ladder" to climb.
- 🍃 The Foliage: Features wide, elliptical, dark green leaves that are notably thicker and more "fleshy" than the more common Bourbon vanilla plant.
- 🌸 The Bloom: Produces elegant, trumpet-shaped flowers in shades of creamy yellow or pale green; each delicate blossom opens for only one day, waiting for a pollinator.
🏡 In Your Garden
- 🧗 The Support System: Because this is an epiphytic vine, it hates being "stuck" in heavy soil. It thrives when grown on a totem, trellis, or even a rough-barked tree where its aerial roots can cling and breathe.
- 💧 Tropical Humidity: This plant isn't just thirsty for water; it’s thirsty for air moisture. It requires high humidity (above 60%) to prevent its leaves from shriveling, making it a perfect candidate for a heated greenhouse or a very steamy sunroom.
- 🐝 The Human Bee: If you want actual vanilla beans, you must become the pollinator! In the absence of the specific Melipona bee, you’ll need to use a toothpick to manually transfer pollen during the few hours the flower is open.
⚠️ Safety & Toxicity
- ✅ Status: Generally non-toxic and safe for homes with curious pets or children.
- 🧪 Details: While the beans are a world-famous spice, the milky sap from a broken stem can occasionally cause mild skin irritation or "vanillism" (a contact dermatitis) in sensitive individuals. It is best to wear gloves when pruning a large vine.
✨ Fun Fact
Unlike the common Vanilla planifolia, which splits open when ripe and loses its seeds, the Tahitian vanilla pod is "indehiscent"—meaning it stays closed even when fully mature, keeping all those precious, flavorful oils locked inside!

Detailed Care Instructions
To grow Vanilla Tahitensis plant, you can follow these steps:
- Purchase or obtain a healthy Vanilla Tahitensis plant or cutting. You can find these plants at well-stocked nurseries or order them online from reputable sellers.
- Choose a suitable location that provides partial shade or filtered sunlight. Vanilla plants thrive in warm and humid climates, so ensure that the spot has a temperature range between 65-85°F (18-29°C) and high humidity levels.
- Prepare a well-draining potting mix. You can create a mix using equal parts of sphagnum moss, perlite, and orchid bark. Vanilla plants prefer moist soil but don't like to be waterlogged.
- Plant the Vanilla Tahitensis cutting or young plant in a large pot with sufficient drainage holes. Make sure the pot is large enough to accommodate the plant's extensive root system.
- Provide support for the Vanilla plant to climb. Vanilla Tahitensis is a vine and needs support to grow vertically. You can use a trellis, pole, or a sturdy stake to provide support for the plant as it grows.
- Water the plant regularly to keep the soil consistently moist but not waterlogged. Aim to maintain a slightly damp growing medium to mimic the plant's tropical habitat. Avoid overwatering, as it can lead to root rot.
- Maintain high humidity around the plant. You can mist the leaves regularly or place a tray of water near the plant to increase humidity levels. Placing the plant near a humidifier or in a greenhouse can also be beneficial.
- Fertilize the Vanilla Tahitensis plant regularly with a balanced orchid fertilizer. Follow the manufacturer's instructions for dilution and frequency of application. Fertilize during the active growing season, typically from spring to fall.
- Prune the plant as needed to control its growth and encourage branching. Trim back any dead or yellowing leaves to promote healthy growth.
- Be patient. Vanilla Tahitensis plants are slow-growing and can take several years to produce flowers and beans. Maintain consistent care and be persistent in providing optimal growing conditions.
Remember that growing Vanilla Tahitensis plants can be challenging, particularly outside their natural habitat. It's important to research and understand their specific requirements to maximize your chances of success.
To properly water this specific plant, first ensure that the soil is moist but not saturated. You can use your finger to test the moisture level in the soil. Water the plant thoroughly but make sure that excess water is able to drain out. It is important to maintain consistent watering, but be careful not to over-water as this can lead to root rot. The plant prefers to be watered in the morning, allowing time for the soil to dry before nighttime. It can also benefit from occasional misting to increase humidity levels.
To fertilize this plant, you will need to use a balanced fertilizer that has equal amounts of nitrogen, phosphorus, and potassium. You should apply the fertilizer once a month during the growing season, which is typically from spring to fall. Be sure to water the plant thoroughly before applying the fertilizer to prevent burning the roots. You can also supplement with trace minerals if needed. Avoid over-fertilizing, as this can lead to excessive foliage growth instead of flowers.
The ideal soil for growing Vanilla Tahitensis is one that is rich in organic matter and well-draining. It should be slightly acidic, with a pH between 5.5 and 6.5. A mix of peat moss, perlite, and vermiculite can provide the necessary conditions for the plant to thrive. It is important to ensure that the soil does not become waterlogged, as this can lead to root rot and other fungal diseases. Regular fertilization with a balanced plant food can also help to support healthy growth.
One method of propagating this plant involves taking stem cuttings. Select a healthy, mature stem with several leaves and make a clean cut just below a node (where a leaf attaches to the stem). Remove the lower leaves on the stem, leaving only a few at the top. Dip the cut end in rooting hormone and plant it in a well-draining potting mix. Keep the soil moist, but not waterlogged, and place the pot in a warm, bright area with indirect sunlight. Cover the pot with a plastic bag to create a humid environment. After several weeks, the cutting should start to root and new growth will appear. Gradually remove the plastic cover and increase the amount of light the plant receives until it is acclimated to its new environment.


