Plant Overview
Often called Brooklime, this charming succulent-like perennial is a wanderer of the wetlands. Historically prized as a remedy for scurvy due to its high Vitamin C content, it was once a staple in "scurvy grass" salads. Today, it is a favorite for water gardeners who want a lush, emerald-green carpet that thrives where other plants would literally drown.
🔍 How to Identify
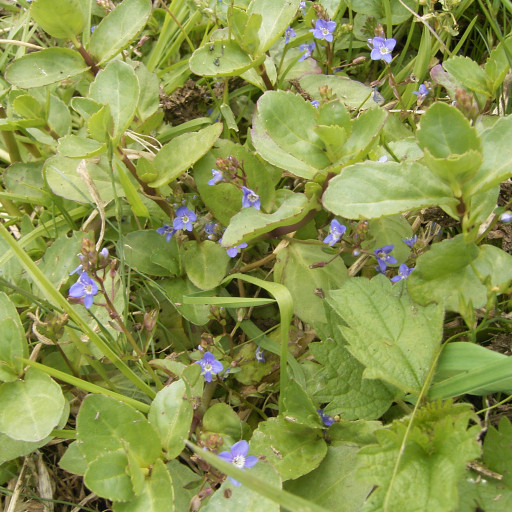
- 🍃 Fleshy Foliage: The leaves are thick, smooth, and oval-shaped, growing in opposite pairs along the stem. They have a slightly rubbery texture, similar to a succulent.
- 🌸 Small Blue Flowers: Like most Speedwells, it produces tiny, four-petaled flowers. They are usually a deep sky-blue with a distinct white "eye" at the center, appearing in loose clusters from late spring to summer.
- 🌱 Creeping Stems: The stems are hollow and reddish, often sprawling across the mud or floating on the water's surface, rooting easily wherever they touch the ground.
🏡 In Your Garden
- 💧 The Perfect "Marginal": This plant loves "wet feet." It is best suited for the edges of ponds, bog gardens, or permanently damp ditches. It acts as a natural filter, helping to clear the water by absorbing excess nutrients.
- ❄️ Winter Interest: Unlike many aquatic plants that disappear in the cold, Brooklime is semi-evergreen. It provides a rare splash of green in the garden during the dreary winter months.
⚠️ Safety & Toxicity
- 🟢 General Safety: Veronica beccabunga is considered non-toxic to cats, dogs, and horses. It is generally safe to handle without gloves.
- 🦠 A Hidden Risk: While the plant itself isn't poisonous, because it grows in slow-moving water, wild specimens can harbor the larvae of the liver fluke parasite. It is strongly advised never to eat wild Brooklime unless it has been grown in a controlled, clean garden environment.
✨ Fun Fact
The specific epithet beccabunga sounds whimsical, but it likely comes from the old German words bach (brook) and bunge (bunch), literally meaning "the bunch that grows in the brook."

Detailed Care Instructions
| Color | Blue To Purple |
| Soil Ph | Neutral |
| Lighting | Full Sun |
| Toxicity | Non-Toxic |
| Soil Type | Loamy, Sandy, Clay, Moist But Well-Drained |
| Bloom Time | Spring, Summer |
| Plant Type | Perennial, Groundcover |
| Mature Size | Up To 2 Ft. |
| Native Area | Europe, Asia, Middle East |
| Sun Exposure | Full, Partial |
| Hardiness Zones | 4-8 |
To grow Veronica Beccabunga (also known as Brooklime), follow these steps:
- Choose a suitable location: Pick a spot with full or partial sunlight and moist soil. Veronica Beccabunga is a water-loving plant and thrives in boggy or wet areas. Consider planting it near a pond, water feature, or in a container with a water source.
- Prepare the soil: Make sure the soil is moist, loamy, and well-draining. Remove any weeds or rocks from the planting area. If the soil is too compacted, work in some organic matter like compost or peat moss to improve drainage.
- Sow the seeds: Veronica Beccabunga can be grown from seeds or propagated by dividing an existing plant. For seeds, sow them about 1/8 inch deep directly into the prepared soil. Space the seeds a few inches apart to allow for growth.
- Water regularly: Since Veronica Beccabunga is a water-loving plant, keep the soil consistently moist. Water it regularly, especially during dry spells. Ensure the soil stays damp but not waterlogged, as excessive water can lead to root rot.
- Mulch the area: Apply a layer of organic mulch, such as straw or bark, around the plant to help retain moisture and suppress weed growth. Mulching also helps regulate soil temperature and prevents soil erosion.
- Trim and maintain: To encourage a healthy and bushy growth, lightly trim the plant after it has finished flowering. This will promote fresh growth and prevent it from becoming too leggy. Regularly removing any dead or damaged stems will also improve the plant's appearance.
- Protect from pests and diseases: Veronica Beccabunga is generally not prone to serious pest or disease problems. However, keep an eye out for slugs and snails, as they may feed on the leaves. If pest activity is observed, take appropriate measures, such as using organic slug control methods or handpicking the pests.
Remember to check your local climate and growing conditions to ensure Veronica Beccabunga is suitable for your area.

Place in a bright room that is sun drenched almost all day. Or directly in a south-facing window.

To properly water this plant, it is important to take into consideration the plant's specific water needs. As a general rule, you should water it deeply and infrequently rather than lightly and frequently. This means that you should allow the soil to dry out partially before watering again.
When watering, you should avoid getting water on the foliage, as this can promote the spread of disease. Ideally, you should water this plant in the morning so that the leaves have time to dry out during the day.
The best way to determine when to water the plant is to stick your finger about an inch into the soil. If it feels dry, it's time to water. You can also use a moisture meter to help determine when to water.
When watering, give the plant enough water so that it runs out of the drainage holes on the bottom of the pot or container. This will ensure that the roots are saturated and have enough water to sustain the plant.
In general, this plant prefers moist, well-draining soil. However, it can also tolerate periods of drought once established.
Remember to adjust your watering schedule based on the conditions in your specific location, as factors such as temperature, humidity, and sunlight can impact how much water the plant needs.
To fertilize this plant, use a balanced, water-soluble fertilizer once a month during the growing season. Dilute the fertilizer according to the package instructions and apply it directly to the soil around the base of the plant. Be sure not to over-fertilize, as this can cause damage to the plant.
The optimal soil for Veronica Beccabunga plant is a well-draining, moist soil that is rich in organic matter. It prefers a soil pH between 6.0 and 7.5. The soil should be fertile and loose enough to allow for easy root growth. It is important that the soil retains moisture, but also drains well, as this plant does not tolerate waterlogged conditions. Additionally, it prefers slightly acidic to neutral soil conditions, making it suitable for a range of garden types. Properly preparing the soil before planting can help ensure a healthy and thriving plant.
To propagate this plant, you will need to take stem cuttings from a healthy parent plant. Use clean and sharp pruning shears to cut a stem that is at least 3-4 inches long and has several leaves on it. Make sure to cut just below a node, which is where the leaves meet the stem.
Remove any leaves from the lower half of the stem, leaving only a few leaves at the top. Dip the cut end of the stem into rooting hormone powder to encourage root growth.
Prepare a container filled with dampened potting soil. Use a pencil or your finger to make a hole in the soil and gently place the stem cutting into it. Firmly press the soil around the base of the stem to secure it in place.
Keep the container in a warm, bright spot but out of direct sunlight. Mist the cutting with water regularly to keep the soil moist but not waterlogged. After a few weeks, tiny roots should start to form at the base of the stem cutting.
Once the roots are well-established, carefully transplant the new plant into a larger container or into your garden. Make sure to water it regularly and keep it in a spot with partial shade and well-draining soil.
Common pests of the european speedwell include Aphids, larvae. Make a habit of checking your european speedwell frequently for pests so that any infestations can be caught and managed early.


