Plant Overview
The Heath Dog-violet, known scientifically as Viola canina, is a hardy little wildflower often found braving the winds of coastal dunes and acidic heaths. Unlike its cousin, the Sweet Violet, it earned the "Dog" prefix in its name during a time when that label meant "inferior" or "common," specifically because this variety lacks a sweet fragrance. Despite the slight, it is a resilient and charming plant that adds a splash of sky-blue to wilder landscapes.
🔍 How to Identify
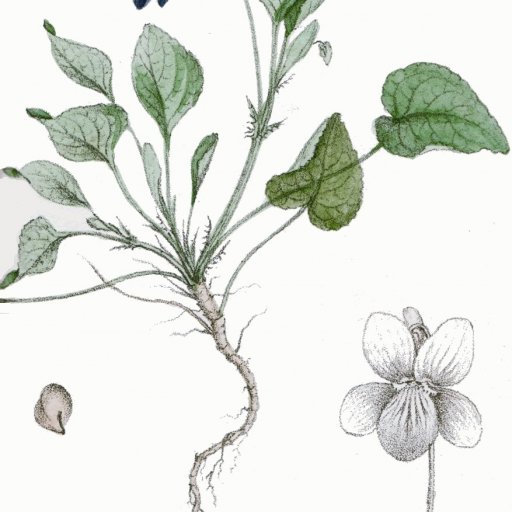
- 🌸 The Flower: Features five delicate petals in shades of sky-blue to deep violet. Look closely at the "spur" (the little tail at the back of the bloom)—in this species, it is typically yellowish or creamy-white and notched at the end.
- 🍃 The Leaves: Heart-shaped but notably narrower and more pointed than other violet species. They are a deep, waxy green and grow along the stem rather than just from the base.
- 🌱 Growth Habit: This plant lacks a "basal rosette" (a circle of leaves at the soil level). Instead, the flower stems are branched and tend to sprawl or lean, giving it a slightly wilder, more chaotic appearance than garden-variety pansies.
🏡 In Your Garden
- 🏜️ Soil Preferences: Unlike many garden plants that crave rich fertilizer, the Heath Dog-violet thrives in "lean" conditions. It loves acidic, sandy, or peaty soils where other plants might struggle to survive.
- 🦋 Wildlife Magnet: It plays a vital role in the ecosystem as a primary food source for the caterpillars of several rare butterflies, including the Small Pearl-bordered Fritillary. If you see holes in the leaves, celebrate—you are hosting a future butterfly!
⚠️ Safety & Toxicity
- ✅ Status: Generally non-toxic and safe for a natural garden.
- 🐕 Details: While not considered poisonous, many wild violets contain saponins which can cause mild stomach upset or vomiting in pets (especially dogs and cats) if consumed in large quantities. It is best treated as an ornamental rather than an edible wild herb.
✨ Fun Fact
The Heath Dog-violet has a secret partnership with ants! Its seeds have a tiny, oily attachment called an "elaiosome." Ants find this treat irresistible, carry the seeds back to their nests to eat the oil, and then "discard" the seed in their underground waste tunnels—effectively planting the violet in perfectly fertilized soil.

Detailed Care Instructions
To grow Viola canina plant, follow these steps:
- Soil preparation: Choose a well-draining soil with a slightly acidic to neutral pH (around 6.0-7.0). Amend the soil with organic matter, such as compost or well-rotted manure, to improve fertility and drainage.
- Planting: Viola canina can either be grown from seeds or transplanted from nursery-bought plants. If starting from seeds, sow them directly into the prepared soil in early spring or late summer. Cover the seeds lightly with soil, about 1/8 inch deep. Water gently to keep the soil moist but not waterlogged. If transplanting, dig a hole large enough to accommodate the root ball and gently place the plant in the hole. Fill the hole with soil and tamp it down gently around the plant.
- Sunlight and temperature: Viola canina prefers partial shade to full sun. Find a location that receives at least 4-6 hours of sunlight each day. The plant is hardy and can tolerate a wide range of temperatures, from cool to mild climates.
- Watering: Keep the soil consistently moist, but not saturated, during the growing season. Check the soil moisture regularly and water whenever the top inch of soil feels dry. Avoid overwatering, as Viola canina prefers well-drained soil.
- Fertilization: If the soil is rich in organic matter, additional fertilizer may not be necessary. However, if the plant shows signs of nutrient deficiency, you can apply a balanced, slow-release fertilizer according to the package instructions.
- Mulching: Apply a layer of organic mulch, such as wood chips or straw, around the base of the plant to conserve moisture, suppress weed growth, and maintain a more stable soil temperature.
- Pruning: Prune the plant regularly to maintain a compact shape and encourage bushier growth. Pinch back the stems or remove spent flowers to promote continuous blooming.
- Pests and diseases: Viola canina is generally resistant to pests and diseases. However, keep an eye out for common issues like aphids or powdery mildew. If detected, treat them with appropriate organic insecticides or fungicides.
By following these steps, you can successfully grow Viola canina plants and enjoy their beautiful flowers.

Place in a window with dappled sun or a spot in the middle of a room. Or directly in a window facing west or east.

To properly water this plant, it is important to consider the soil type and moisture level. Viola Canina should be grown in well-draining soil, as it prefers moist but not waterlogged conditions. Water the plant deeply and thoroughly until the water seeps out of the drainage holes, making sure to avoid getting water on the leaves or flowers. The frequency of watering will depend on the climate and environment, but it is generally recommended to water when the top inch of soil is dry to the touch. Overwatering can lead to root rot and other health issues, so it is important to monitor the soil moisture and adjust watering accordingly.
To fertilize this plant, first ensure that the soil is moist. Then, apply a slow-release fertilizer that is high in nitrogen and potassium. Spread the fertilizer around the base of the plant and be careful not to get it on the leaves. Water the plant afterward to help distribute the fertilizer into the soil. Repeat this process every 2-3 months during the growing season, but avoid fertilizing during the winter months.
The recommended soil for Viola Canina plant is a well-draining one that is rich in organic matter. It should be slightly acidic with a pH range of 5.5 to 6.5. The soil texture should be medium to light with good porosity to allow air circulation and water drainage. It should also have enough nutrients to support the growth and development of the plant. To achieve this, it is advisable to mix in compost or well-rotted manure into the soil before planting. The soil should also be watered regularly but not allowed to become waterlogged. It is important to note that this plant prefers slightly moist soil, but overwatering can lead to root rot.
To propagate this plant, you should first identify a mature and healthy plant from which to take cuttings. Select a stem that is firm and healthy, and using a clean and sharp cutting tool, cut a 4-6 inch section of the stem just below a node or leaf. Remove any leaves from the bottom 1-2 inches of the cutting.
Once you have your cutting, prepare a pot with well-draining potting soil and water it thoroughly. Using a pencil or other pointed object, make a small hole in the soil and insert the cutting, pressing the soil firmly around it. Water the cutting again and cover it with a plastic bag or dome to create a humid environment.
Place the pot in a bright location, out of direct sunlight, and keep the soil moist but not waterlogged. In a few weeks, you should see new growth appearing on the cutting, indicating that it has rooted successfully. Gradually remove the plastic cover and begin to acclimate the cutting to normal growing conditions.
Once the plant has developed a strong root system and is growing vigorously, it can be transplanted into a larger pot or into the garden. With proper care, it will continue to grow and produce beautiful flowers year after year.


