Plant Overview
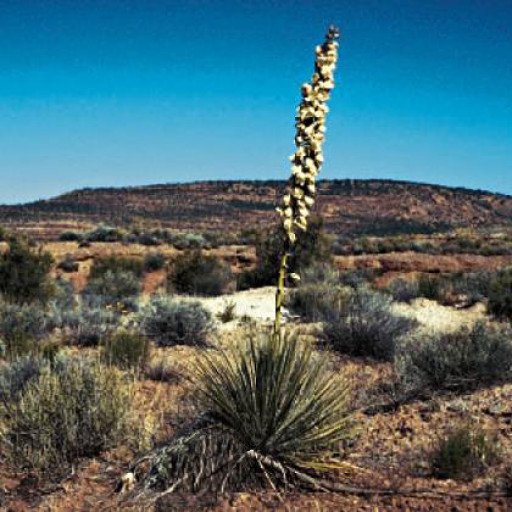
Commonly known as the Narrowleaf Yucca, this architectural beauty is a desert icon of the American Southwest. Often resembling a shimmering fountain of spiky grass, it carries a storied history with indigenous cultures, who used its tough fibers for everything from sandals to baskets. It is the definition of "rugged elegance," thriving in harsh, sun-drenched landscapes where most plants would wither.
🔍 How to Identify
- 🌵 The Foliage: Look for incredibly thin, needle-like leaves that grow in a dense, symmetrical rosette. Unlike some broader Yuccas, these are very narrow and flexible.
- 🧶 Marginal Fibers: The edges of the leaves often peel back into fine, curly white threads. This "hairy" appearance is a signature trait that adds a soft texture to a sharp plant.
- 🔔 The Bloom: In late spring, it sends up a tall, woody stalk adorned with large, nodding, bell-shaped flowers that range from creamy white to a pale, ghostly green.
🏡 In Your Garden
- 🏗️ The "Forever Home" Rule: This species develops a deep, tenacious taproot system designed to find water deep underground. Because of this, it hates being moved; transplanting an established Narrowleaf Yucca often results in shock or failure.
- 🏜️ Drainage is King: While it is virtually "unkillable" by drought, it will rot quickly in "wet feet." It requires sandy or rocky soil that mimics its native high-desert plateaus.
⚠️ Safety & Toxicity
- ⚔️ Physical Hazard: The most immediate danger is the sharp, terminal spine at the tip of each leaf. These can easily puncture skin or cause eye injuries, so it should be planted away from narrow walkways or children's play areas.
- 🐾 Pet Warning: The plant contains saponins, which are toxic to dogs and cats. If ingested, it can cause drooling, vomiting, or coordination issues.
- 🧼 Skin Sensitivity: For some gardeners, the sap or the fibers can cause mild skin irritation or dermatitis during pruning.
✨ Fun Fact
The Narrowleaf Yucca has a "secret marriage" with the Yucca Moth. The plant cannot produce seeds without the moth, and the moth’s larvae cannot survive without the plant's seeds. The female moth intentionally collects pollen and "plugs" it into the plant's stigma—an act of deliberate pollination rarely seen in the insect world!

Detailed Care Instructions
To grow Yucca angustissima, also known as the narrowleaf yucca, follow these steps:
- Climate and Soil: Yucca angustissima thrives in hot and dry climates. It prefers well-draining sandy or sandy loam soil. Choose a location that receives full sun exposure.
- Watering: Initially, water the plant regularly to help it establish its roots. Once established, yucca angustissima is drought tolerant, and watering can be reduced to once every two to three weeks. Avoid overwatering, as it can lead to root rot.
- Propagation: Yucca angustissima can be propagated from both seeds and offsets. Seeds can be planted in well-draining soil indoors or directly outside in the spring. Offsets, or baby plants growing at the base of the mother plant, can be separated and replanted. Allow the offsets to dry for a few days before planting them in well-draining soil.
- Planting: Dig a hole twice the size of the root ball and place the plant in the hole. Backfill the hole with soil and firmly press it down around the plant to eliminate air pockets. Leave a small depression around the plant to help capture and retain water.
- Fertilizer: Yucca angustissima generally does not require fertilizer. However, you can apply a small amount of a balanced slow-release fertilizer during the spring to promote healthy growth. Always follow the fertilizer manufacturer's instructions for application rates.
- Pruning: Trim off any dead or damaged leaves near the base of the plant. Yucca angustissima rarely requires extensive pruning, but you can remove any brown or yellow leaves as needed to maintain its appearance.
- Pests and Diseases: Yucca angustissima is generally resistant to pests and diseases. However, it can occasionally be affected by mealybugs or scale insects. Use a cotton swab soaked in rubbing alcohol to remove these pests.
- Winter Care: Yucca angustissima is cold tolerant and can withstand freezing temperatures. However, in areas with prolonged and severe frost, it is advisable to cover the plant with a frost blanket or move potted plants indoors during the winter months.
By following these steps, you can successfully grow and care for Yucca angustissima.

Place in a bright room that is sun drenched almost all day. Or directly in a south-facing window.

In order to water this particular plant, you should use a watering can or hose with a nozzle attachment. When watering, aim for the soil around the plant rather than the leaves or stems. Make sure the soil is completely saturated but avoid overwatering, as this can lead to root rot. Monitor the plant's soil moisture levels by sticking your finger into the soil about an inch deep; if it feels dry, it's time to water. However, if the soil already feels moist, wait a few days before watering again. Additionally, during hot summer months, you may need to water the plant more frequently to prevent it from drying out.
To properly fertilize the plant, use a balanced, slow-release fertilizer with equal amounts of nitrogen, phosphorus, and potassium. Apply the fertilizer once every two months during the growing season, which is typically from spring through summer. Be sure to follow the package instructions for the specific fertilizer you are using, and avoid over-fertilizing or using any fertilizer that contains high amounts of nitrogen, which can burn the plant's roots. Always water the plant thoroughly after fertilizing to help distribute the nutrients evenly.
The ideal soil for Yucca Angustissima plant is a well-draining, sandy soil that is nutrient-rich and has a slightly acidic to neutral pH level. The soil should be able to retain some moisture, but should not hold too much water as this can lead to root rot. A mixture of sand, perlite, and peat moss can be used to create the ideal soil composition. It is also important to avoid using heavy or clay soils as they can impede drainage and cause the roots to become waterlogged.
To propagate this plant, you will need to gather a leaf or stem cutting from the mother plant that has grown to maturity. Use a sharp, sterilized pair of scissors or a knife to make a clean cut below the leaf node or stem joint. Remove any bottom leaves or flowers to prevent rotting and improve the chances of rooting.
Next, prepare a well-draining potting mix of sand, perlite, and peat moss. Plant the cutting in the mix, water it generously, and cover it with a plastic bag or dome to create a humid environment. Place the pot in a bright, warm spot, but away from direct sunlight.
Check the cutting every few days for signs of new growth or roots. Keep the soil moist but not waterlogged, and ventilate the bag or dome regularly to prevent mold and rot. Once the cutting has rooted and developed new shoots, you can transplant it to a bigger pot or outdoors in a sunny, well-draining location.


