Plant Overview
Known widely as the Calla Lily, Arum Lily, or even the "Pig Lily" in its native South Africa, Zantedeschia aethiopica is the epitome of botanical elegance. Its architectural silhouette has made it a timeless symbol of purity and rebirth, appearing frequently in Art Deco paintings and bridal bouquets. Despite its delicate, high-fashion reputation, this plant is surprisingly rugged and thrives in marshy environments where other flowers might struggle.
🔍 How to Identify
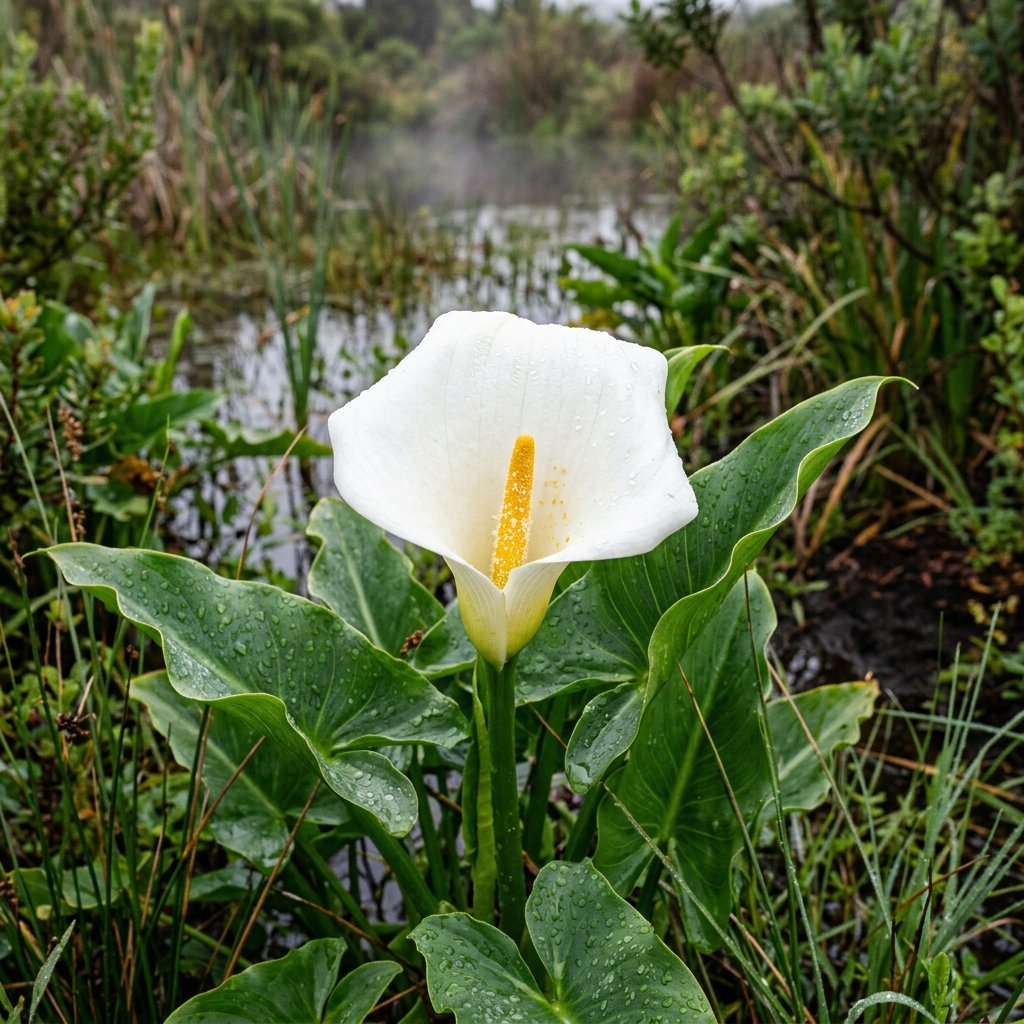
- 🌿 The Foliage: Large, glossy, arrow-shaped (sagittate) leaves that grow on thick, succulent stalks. Unlike some hybrids, these leaves are solid green without any white spotting.
- 🕊️ The Spathe: A large, creamy-white modified leaf that wraps gracefully around the center. This is the "flower" most people recognize, though it is technically a bract.
- 🕯️ The Spadix: A bright yellow, finger-like spike located in the center of the white spathe, which actually holds the plant’s tiny, true flowers.
🏡 In Your Garden
- 💧 Wet Feet: Unlike most garden plants that demand "well-draining soil," the Calla Lily is semi-aquatic. It is perfectly happy planted at the edge of a pond or in "boggy" areas where the soil stays consistently saturated.
- 🌱 Rhizome Power: These plants grow from thick underground stems called rhizomes. They are heavy feeders and appreciate rich, organic matter, but be careful when transplanting; they prefer to stay undisturbed once they have established their deep root system.
⚠️ Safety & Toxicity
- 🚫 Toxic Status: Highly toxic to humans, cats, and dogs.
- 🧪 The Danger: Every part of the plant contains insoluble calcium oxalate crystals. If chewed or swallowed, these crystals cause immediate burning of the mouth and throat, significant swelling, and digestive distress. The sap can also cause skin irritation, so wearing gloves while pruning is recommended.
✨ Fun Fact
Despite its common name, the Calla Lily is neither a "Calla" nor a "Lily." It belongs to the Araceae family, making it a closer relative to the Philodendron and the Monstera than to the true lilies you find in the Lilium genus!

Detailed Care Instructions
Calla lilies are easy plants to care for, only requiring a sunny location, regular watering, and plant food on occasion to encourage flowering.
How fast do calla lilies grow?
Calla lilies are fast-growing plants that can grow up to three feet tall in one growing season.
What's the difference between calla lilies and canna lilies?
Canna lilies (Canna spp.) and calla lilies (Zantedeschia spp.) are known for their full, luscious summer blooms and rhizomes. Canna lilies can grow up to eight feet tall, while calla lilies max out at three feet in height. Cannas have large, banana-like, or paddle-shaped leaves in green, burgundy, or variegated colors. Callas have long, arrow-shaped green or green and white leaves.
| Color | White, Pink, Coral, Maroon, Orange, Yellow |
| Soil Ph | Acidic |
| Humidity | Normal |
| Invasive | Weed |
| Lighting | Part Sun |
| Toxicity | Poisonous |
| Soil Type | Moist But Well-Drained |
| Bloom Time | Summer |
| Difficulty | Medium |
| Plant Type | Rhizome |
| Mature Size | 2–3 Ft. Tall, 1–2 Ft. Wide |
| Native Area | Africa (South Africa, Swaziland) |
| Temperature | 20°C - 25°C |
| Sun Exposure | Full, Partial |
| Hardiness Zones | 8-10 |
To grow Zantedeschia aethiopica, commonly known as the Calla Lily, you can follow these steps:
- Choose the right location: Zantedeschia aethiopica prefers a spot that receives partial shade or filtered sunlight. It can tolerate full sun, but it might require more frequent watering in hot climates. Ensure the location has well-draining soil.
- Planting: Start by obtaining healthy rhizomes or tubers of Zantedeschia aethiopica. Plant them in spring after the danger of frost has passed. Dig a hole about 4-6 inches deep and place the rhizome inside with the growing tips facing upward. Space multiple rhizomes 12-18 inches apart.
- Soil and mulch: Use rich, fertile soil that retains moisture but drains well. Incorporate organic matter like compost or well-rotted manure during planting. Mulching with organic material like straw or wood chips can help conserve moisture and keep weeds at bay.
- Watering: Keep the soil consistently moist but not overly saturated. Aim for a soil moisture level akin to a wrung-out sponge. In hot weather, the plant may need more frequent watering. Avoid letting the soil dry out completely or sitting in waterlogged conditions.
- Fertilization: Apply a balanced, slow-release fertilizer during planting and then again in early summer. Follow the manufacturer's instructions for application rates. Alternatively, you can use a liquid fertilizer at half the recommended strength every two to three weeks during the growing season.
- Pruning and deadheading: Remove any dead or yellowing leaves as they appear. After the flowering period, deadhead the spent blooms to encourage continuous blooming and prevent the plant from using energy to produce seeds.
- Overwintering: In cooler climates, Zantedeschia aethiopica may not survive frost. Before the first frost, cut back the foliage to about an inch above the ground. Apply a layer of mulch around the plant to insulate the rhizomes during winter. In colder regions, it might be better to dig up the rhizomes and store them in a cool, dry place until spring.
Following these steps should help you successfully grow Zantedeschia aethiopica and enjoy its beautiful white or yellow flowers.

Place in a window with dappled sun or a spot in the middle of a room. Or directly in a window facing west or east.

To water this plant, you should make sure the soil is evenly moist, but not waterlogged. It is important to allow the top inch of soil to dry out slightly between waterings. When watering, pour water slowly and evenly over the entire root ball until water runs out of the drainage holes at the bottom of the pot. Avoid getting water on the leaves as this can lead to fungal diseases. In winter, reduce watering to once every two weeks.
To properly fertilize this plant, begin by selecting a balanced, water-soluble fertilizer that is designed specifically for indoor plants. Follow the instructions provided on the package, as the exact amount of fertilizer needed may vary by brand. Typically, you will need to dissolve the fertilizer in water and apply it to the soil around the base of the plant. Be sure to avoid getting any fertilizer on the leaves or flowers, as this can burn the plant. It is recommended to fertilize this plant every two to four weeks during the growing season, which typically lasts from early spring to late summer. In the fall and winter, reduce the frequency of fertilization to once every four to six weeks. Over-fertilization can lead to root damage or fertilizer burn, so it is important to measure the fertilizer carefully and stick to the recommended schedule.
The ideal soil for this plant should have a slightly acidic to neutral pH range, typically between 6.0 and 7.0. Additionally, it is important that the soil is well-draining and has good aeration properties to allow for proper root development and prevent waterlogged conditions. A mixture of peat moss, perlite, and sand is often recommended for planting Zantedeschia Aethiopica. This type of soil mix will provide the necessary drainage, aeration, and nutrient retention required for healthy growth. It is also important to regularly amend the soil with organic matter, such as compost or well-aged manure, to ensure the plant receives adequate nutrients.
Zantedeschia Aethiopica plant can be propagated through division, seed or tissue culture methods.
Division: Divide mature clumps of the plant in the spring or fall by cutting through the rhizomes or tubers with a sharp, sterile knife. Make sure each division has several healthy shoots and roots, and replant them in well-draining soil.
Seed: Collect ripe seed pods from the plant and allow them to dry. Once the pods have dried, carefully remove the seeds and sow them in a seed tray filled with a well-draining potting mix. Keep the soil moist and warm, and the seedlings should emerge within two weeks.
Tissue Culture: Cut a small piece of leaf, stem, or root tissue from the plant and transfer it to a sterile culture medium in a laboratory. Allow the tissue to grow and develop into new plantlets, which can then be transferred to soil in pots or containers and grown to maturity.
Regardless of the propagation method used, it's important to ensure that the new plants are kept in a warm, moist environment with proper lighting and adequate nutrients. Regular watering, fertilizing, and pruning can help promote healthy growth and ensure the plants thrive.
Common pests of the calla lily include Mealybugs, spider mites, aphids, thrips. Make a habit of checking your calla lily frequently for pests so that any infestations can be caught and managed early.


