Plant Overview
Known as the Spotted Calla Lily, this South African native is the sophisticated cousin of the classic white Arum. Its botanical name, albomaculata, literally translates to "white-spotted," referring to the galaxy of translucent speckles that decorate its foliage. It is a favorite in high-end floral arrangements and moon gardens for its architectural silhouette and ghostly elegance.
🔍 How to Identify
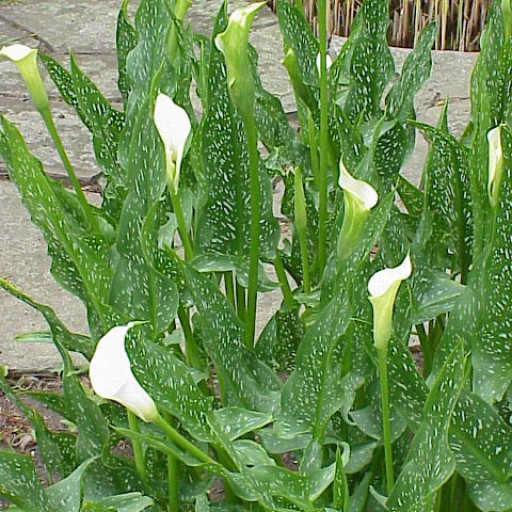
- 🌿 Spotted Foliage: The most striking feature is the lance-shaped, deep green leaves covered in elongated white translucent spots that look like tiny windows.
- 🍦 The "Flower": What looks like a petal is actually a "spathe"—a waxy, funnel-shaped leaf that protects the "spadix" (the yellow textured spike in the center).
- 🎨 Inner Glow: The throat of the funnel often features a deep, royal purple or maroon blotch at the very base, creating a dramatic contrast against the creamy-white spathe.
🏡 In Your Garden
- 💧 The Drainage Dance: While these plants love moisture, they are highly susceptible to "rhizome rot." They need soil that holds water but lets the excess escape quickly—think of it like a wrung-out sponge.
- 😴 Seasonal Slumber: This plant is a "geophyte," meaning it retreats into an underground bulb-like structure to survive the winter. If the leaves turn yellow and die back in autumn, don't worry—it’s just entering a necessary dormancy.
- ☀️ Light Nuance: In cooler climates, it loves full sun, but in scorching regions, it prefers "dappled shade." Too much direct heat can cause the white spathes to turn brown at the edges.
⚠️ Safety & Toxicity
- 🚫 Status: Toxic to humans, cats, and dogs.
- 🧪 The Culprit: The plant contains insoluble calcium oxalate crystals. If bitten or chewed, these crystals act like tiny needles, causing intense mouth irritation, swelling of the throat, and drooling. Always wear gloves when pruning if you have sensitive skin, as the sap can cause mild itching.
✨ Fun Fact
Despite its common name, the Calla Lily is not a "true" lily at all! It belongs to the Araceae family, making it a closer relative to the hardy Jack-in-the-Pulpit and the popular Monstera than to the lilies found in the Lilium genus.

Detailed Care Instructions
| Color | Ivory White |
| Soil Ph | Acidic |
| Humidity | Normal |
| Lighting | Full Sun |
| Toxicity | Poisonous |
| Soil Type | Moist But Well-Drained |
| Bloom Time | Summer |
| Difficulty | Medium |
| Plant Type | Rhizome |
| Hibernation | Cold Period |
| Mature Size | 1-2 Ft. Tall |
| Native Area | Africa (South Africa, Swaziland) |
| Temperature | 18°C - 26°C |
| Sun Exposure | Full, Partial |
| Hardiness Zones | 8-10 |
To grow Zantedeschia Albomaculata (also known as white-spotted arum or calla lily), follow these steps:
- Select a suitable location: Find a planting spot with full to partial sun exposure. Zantedeschia Albomaculata prefers well-drained soil that is rich in organic matter.
- Prepare the soil: Dig a hole that is approximately twice as wide and deep as the plant's root ball. Mix compost or well-rotted manure into the soil to improve its fertility and drainage.
- Planting: Place the Zantedeschia Albomaculata rhizome (a thick, fleshy root system) in the hole with the pointed end facing upwards and the roots spread out. Cover the roots with soil, but keep the top of the rhizome slightly above the ground level.
- Watering: Water the plant thoroughly after planting, and then keep the soil consistently moist but not waterlogged. Zantedeschia Albomaculata prefers evenly moist soil during its growing season.
- Fertilizing: Apply a balanced, slow-release fertilizer during the growth period (spring to late summer) to provide essential nutrients. Follow the manufacturer's instructions for proper application rates and timing.
- Mulching: Apply a layer of organic mulch, such as wood chips or straw, around the plant to conserve moisture, suppress weed growth, and insulate the roots.
- Maintenance: Regularly remove any dead or yellowing foliage from the plant. This will help prevent diseases and improve the overall appearance of the plant.
- Overwintering: In areas with frost, Zantedeschia Albomaculata might need protection during winter. Mulch the soil heavily around the plant to insulate the rhizome and prevent freezing. Alternatively, you can dig up the rhizome after the foliage dies back in the fall and store it in a cool, dry place until spring.
- Propagation: Zantedeschia Albomaculata can be propagated by dividing the rhizome. Lift the plant in early spring or fall, divide the rhizome into sections with at least one growing point, and replant each section.
- Pests and diseases: Watch out for pests such as aphids, slugs, and snails. Treat infestations with appropriate organic pest control methods. Common diseases include root rot and fungal leaf spots. Ensure proper drainage and good air circulation to prevent these issues.
By following these guidelines, you can successfully grow Zantedeschia Albomaculata and enjoy its beautiful white-spotted flowers.

Place in a window with dappled sun or a spot in the middle of a room. Or directly in a window facing west or east.

Zantedeschia Albomaculata plant requires proper watering to grow healthy. To water this plant, you should use a watering can or hose with a soft spray attachment. Before watering, make sure to check the soil moisture level by inserting your finger about an inch into the soil. If the soil feels dry, it's time to water.
When watering the plant, ensure that water reaches the roots but does not pool on the surface soil. You should water the plant thoroughly until water starts to drain from the pot's bottom holes. Once the water has drained completely, remove any excess water from the saucer.
The frequency of watering Zantedeschia Albomaculata largely depends on the surrounding environment's temperature and humidity. It is recommended to water this plant when the top one to two inches of soil feel dry to the touch. Over-watering can lead to root rot or other harmful fungal diseases, so be careful not to water too much.
Overall, providing consistent watering while avoiding over-watering is key to maintaining a healthy and vibrant Zantedeschia Albomaculata plant.
To fertilize this plant, use a balanced fertilizer with equal amounts of nitrogen, phosphorus, and potassium. Apply the fertilizer every two weeks during the growing season, from spring to fall. Mix one tablespoon of fertilizer with one gallon of water and apply the solution to the soil around the base of the plant. Avoid getting the fertilizer on the leaves or flowers. Water the plant thoroughly after fertilizing to help distribute the nutrients. Cut back on fertilizing in the winter months when the plant is dormant.
The ideal soil for the plant has good drainage and is rich in organic matter. A soil mixture with peat moss, vermiculite and perlite can be used. The pH level of the soil should be between 6.5 to 7.5. The plant prefers slightly acidic to neutral soil. It is important to avoid heavy soil that can hold water for too long as it can lead to root rot. Soil that is too sandy can result in the plant not receiving enough nutrients or moisture. The plant can also benefit from regular fertilization with a balanced fertilizer.
Zantedeschia Albomaculata plant can be propagated through rhizome division. To do this, remove the plant from its pot or garden bed and separate the rhizomes, making sure each section has a cluster of roots and a growing point. It is important to use a clean, sharp knife to prevent damage to the rhizomes.
Once the rhizomes have been separated, plant each section in well-draining soil and water thoroughly. Place the new plants in a bright area with indirect sunlight and keep the soil consistently moist, but not waterlogged.
It may take several weeks for the new plants to establish themselves and begin to produce new growth. Once they have started to grow, you can begin fertilizing them with a balanced plant food every few weeks. With proper care, the new plants will grow and thrive, eventually producing their own rhizomes that can be divided for further propagation.
Common pests of the calla lily include Mealybugs, spider mites, aphids, thrips. Make a habit of checking your calla lily frequently for pests so that any infestations can be caught and managed early.


