There is nothing quite as heartbreaking for a plant parent as checking on your beautiful, blooming orchid, only to find the top leaves turning yellow and falling off at the slightest touch. If you are experiencing this, take a deep breath! Plant issues happen to absolutely everyone, from beginners to seasoned botanists. You haven’t failed your plant; you have just encountered one of the most common indoor gardening hurdles: orchid crown rot.
While it sounds intimidating, understanding how this issue develops is the first step toward saving your beloved plant. Let’s break down exactly what crown rot is, why it happens, and how you can nurse your orchid back to health.
The Problem: Identifying Orchid Crown Rot
In orchids like the popular Phalaenopsis (moth orchid), the crown is the very center and top of the plant where all the new leaves emerge. Crown rot is a localized infection that attacks this vital growth point, turning the healthy tissue into a soft, decaying mess.
If you are unsure what is wrong with your plant, you can always use the AI-powered plant disease scanner in the Plantiary app to get a diagnosis in seconds. However, the most common symptoms of crown rot include:
- Rapid yellowing or browning at the base of the top-most leaves.
- Mushy, black, or brown tissue right in the center of the plant.
- Leaves dropping effortlessly from the top down, often while the lower leaves still look perfectly green.
- A foul, swampy odor coming from the center of the orchid.
The Causes: Why Does Crown Rot Happen?
Orchid crown rot is almost always caused by a combination of trapped water and poor air circulation. When water accidentally pools in the crown of the orchid during watering, it creates a dark, stagnant environment. This trapped moisture acts as an open invitation for opportunistic fungal and bacterial pathogens to move in and rapidly multiply.
In their natural habitat, these orchids grow sideways on tree trunks, allowing rainwater to roll harmlessly off their leaves. In our homes, they are potted upright, making it incredibly easy for water to collect in the center if we water them from above. Coupled with cool temperatures and low indoor airflow, the crown simply stays wet for too long.
The Solutions: How to Rescue Your Orchid
If you have caught the rot early and there is still some firm, green tissue left, your plant has a fighting chance! Follow this scientifically backed, step-by-step treatment plan to halt the infection.
Step 1: Isolate and Assess Move your orchid away from your other houseplants to prevent the spread of any fungal spores. Gently tug on the top leaves. If they are completely detached at the base, remove them to expose the infected area.
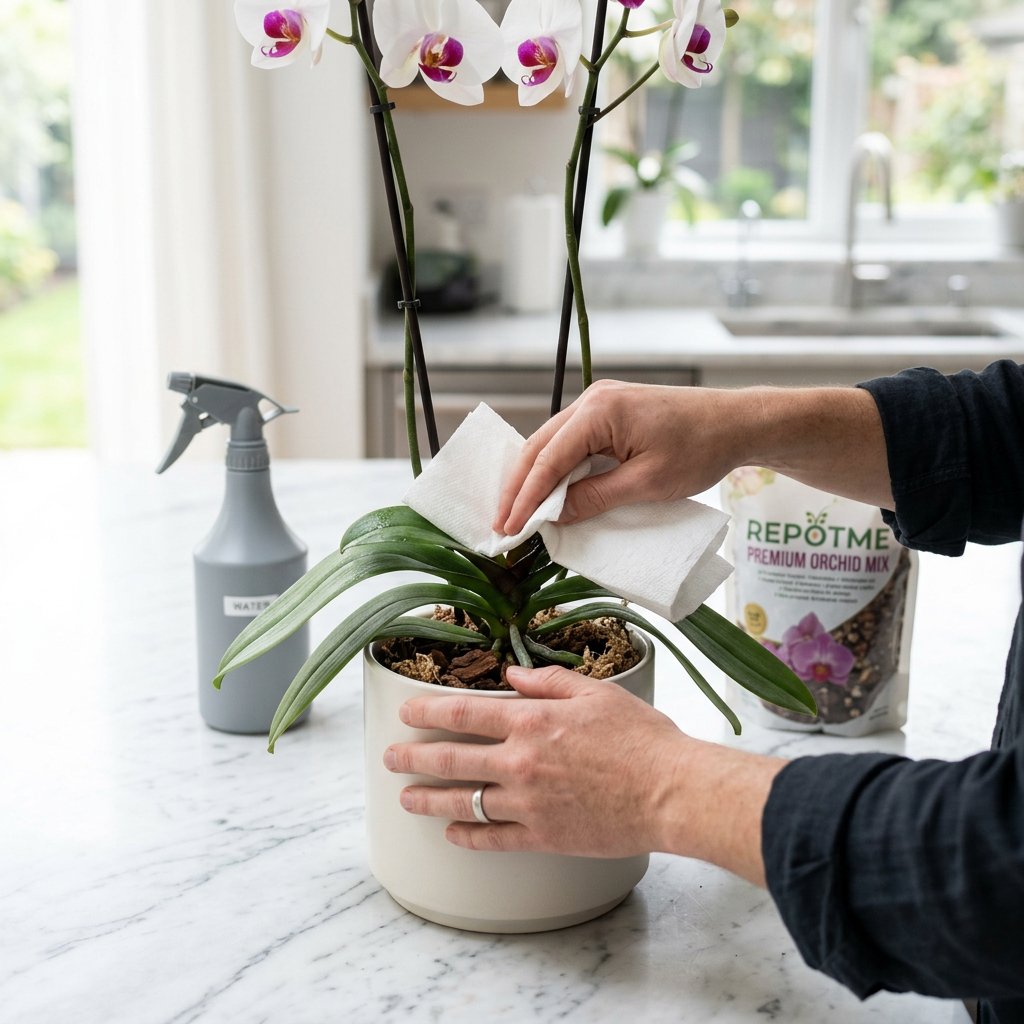
Step 2: Clean the Crown Using a clean cotton swab or paper towel, gently dab away any standing water or soft, mushy, decayed plant tissue from the center. You want to expose the firmer tissue underneath without damaging the plant further.
Step 3: Treat with Hydrogen Peroxide (3%) Pour a small amount of standard 3% hydrogen peroxide directly into the infected crown. You will immediately see it fizz and bubble. This oxidizing action kills the active bacterial and fungal pathogens safely. Let it bubble for about five minutes, then gently tip the orchid upside down to drain out the excess liquid completely. Use a fresh cotton swab to dry the area thoroughly.
Step 4: Apply a Fungicide For severe rot, apply a commercial, copper-based plant fungicide to the crown according to the package instructions. This will create a protective barrier to prevent the rot from returning while the plant heals.
Step 5: Adjust Care and Wait Place the orchid in a warm, brightly lit spot out of direct sunlight. Ensure there is good airflow in the room (a small fan works wonders). Do not water the plant for a week to allow the tissue to dry out and callous over. If the orchid survives, it will eventually push out a new offshoot—often called a "keiki"—from the base!
Preventing Crown Rot in the Future
Prevention is always the best medicine. Keep these simple practices in mind to keep your orchids thriving:
- Water the roots, not the leaves: Always water your orchid by soaking the pot in a basin of water (bottom watering) or carefully pouring water only over the potting medium.
- The morning rule: Water your orchids early in the day so any accidental splashes have time to evaporate before cooler nighttime temperatures set in.
- Keep it dry: If you accidentally splash water into the crown, simply dab it dry with a paper towel immediately.
- Track your care: Overwatering is a primary trigger for rot. Use the Plantiary app to log your watering days and set tailored care reminders so your orchids dry out perfectly between waterings.
Seeing your plant struggle can be stressful, but by adjusting your watering habits and acting quickly when symptoms appear, you are well on your way to becoming a more confident, successful plant parent. Keep your chin up and keep growing!