Have you noticed your beautiful Bird's Nest Fern (Asplenium nidus) looking a little under the weather? Don't worry, you aren't alone! These stunning, ripple-leafed beauties are beloved for their lush, tropical vibe, but they can be a bit finicky when it comes to their watering routine. If the center of your fern has suddenly turned dark or mushy, you might be dealing with crown rot. Please don't beat yourself up if this happens—it is an incredibly common issue, even for seasoned plant parents! Catching it early is half the battle, and if you are ever in doubt, you can use the AI-powered plant disease scanner in the Plantiary app to get an accurate diagnosis in seconds.
Let's dive into what crown rot is, why it happens, and how you can prevent it to keep your fern thriving.
The Problem: Spotting Crown Rot
To understand crown rot, it helps to know what the "crown" actually is. The crown of a plant is the central base where the roots meet the stems, and it is exactly where all the new leaves emerge. In a Bird's Nest Fern, this forms a gorgeous, nest-like rosette.
Unfortunately, this funnel-like shape makes it a perfect trap for excess moisture. If water sits in this central nest for too long, it invites fungal or bacterial pathogens that break down the plant tissue. Keep an eye out for these tell-tale symptoms:
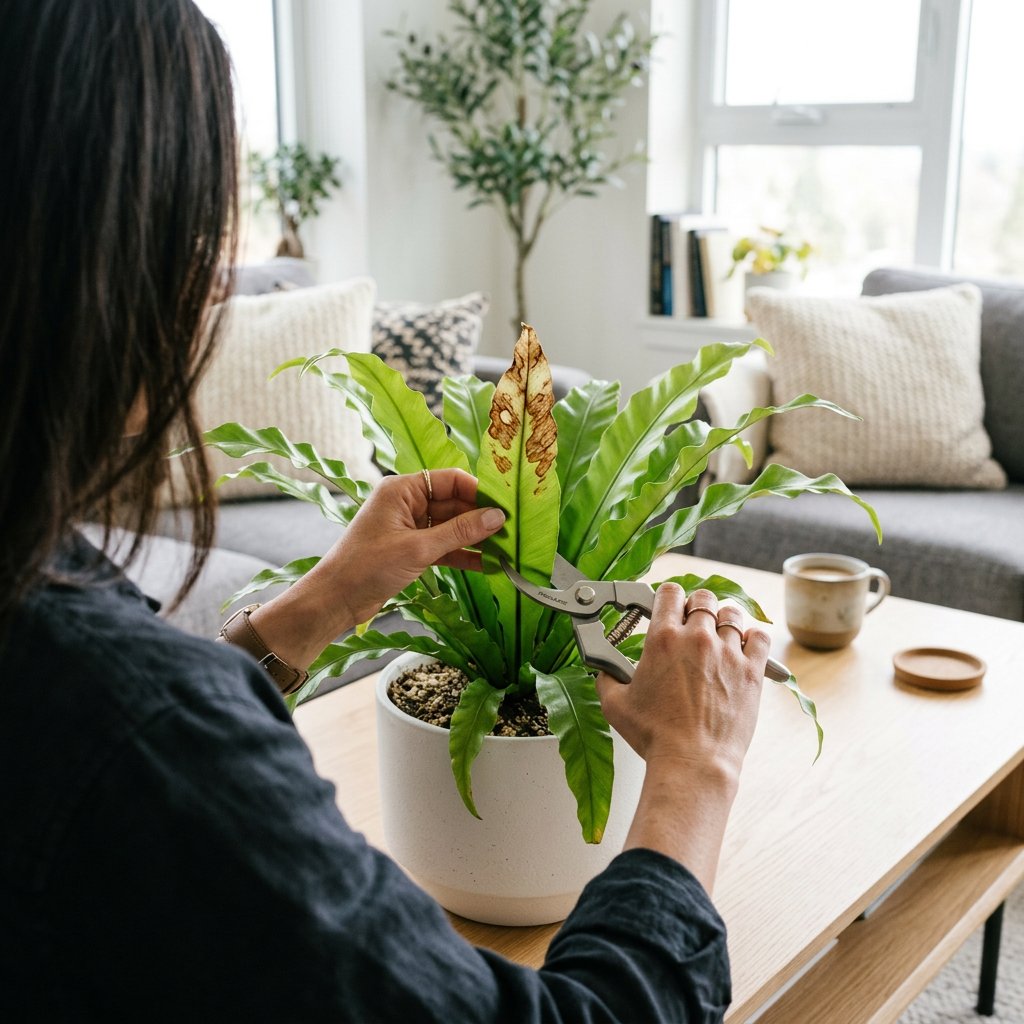
- A mushy, black center: The fuzzy core of the fern turns dark and soft to the touch.
- Detaching fronds: Leaves may turn yellow or brown at the base and fall out of the center with the gentlest tug.
- Stunted new growth: Baby leaves emerge deformed, blackened, or stop growing entirely.
- A foul odor: Rotting plant tissue often emits a slightly sour, swampy smell.
The Causes: Why Does Crown Rot Happen?
Fungal and bacterial diseases thrive in wet, stagnant environments. When moisture sits in the center of your fern, it creates the ultimate breeding ground for these microbes. Crown rot is almost always triggered by environmental factors, including:
- Top-watering directly into the nest: Pouring water straight over the top of the plant causes water to pool directly in the crown.
- Heavy, waterlogged soil: Bird's Nest Ferns are naturally epiphytes (plants that grow on the surface of trees in the wild, rather than in the ground). When planted in dense potting soil that holds too much water, their roots suffocate.
- Poor airflow: Without good air circulation in your home, trapped water simply cannot evaporate efficiently.
The Solutions: Step-by-Step Prevention and Treatment
Prevention is absolutely your best tool here, but if you have caught the rot in its early stages, you can still save your green friend! Follow these actionable steps to keep your Bird's Nest Fern rot-free.
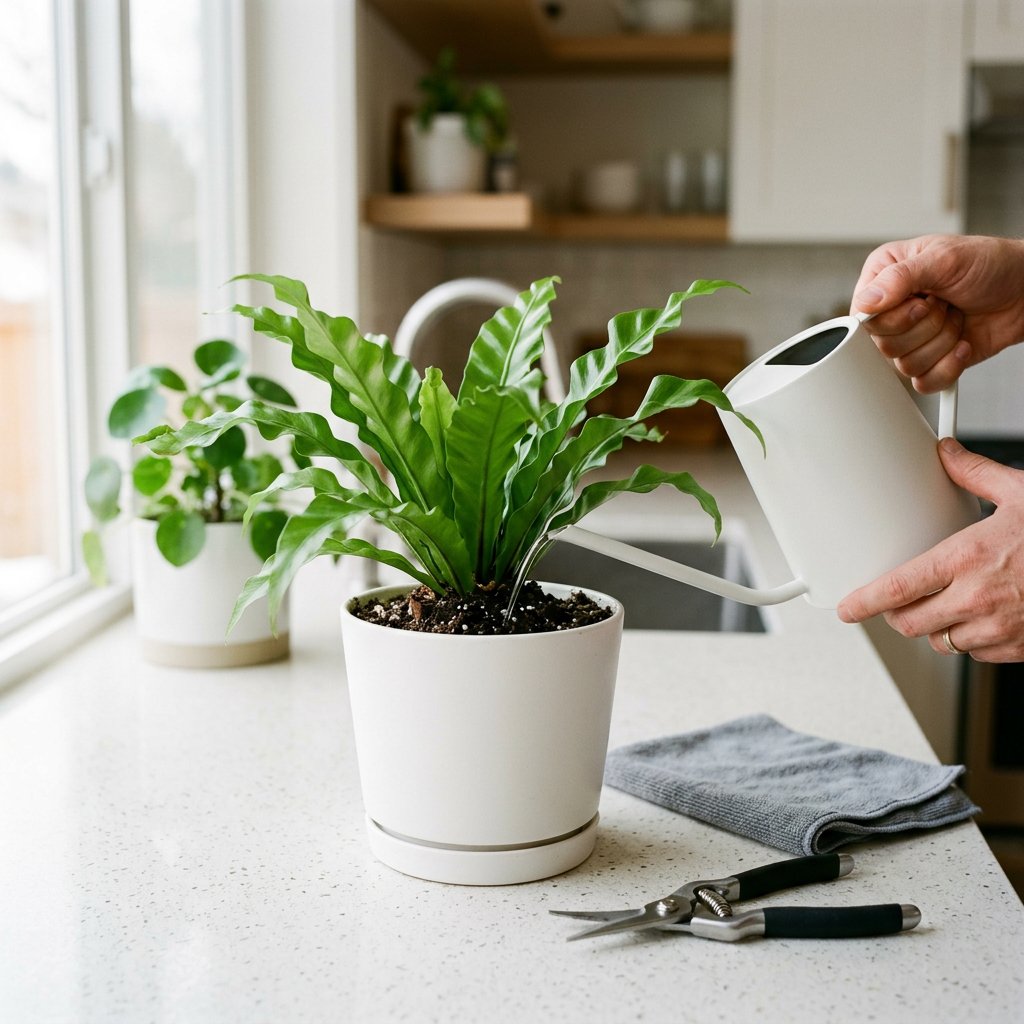
Step 1: Change your watering technique Never pour water directly into the center of the fern. Instead, aim the spout of your watering can directly at the soil beneath the leaves. Alternatively, you can try "bottom watering." Simply place your fern's nursery pot in a bowl of water for 15-20 minutes, allowing the roots to soak up moisture from the bottom without ever wetting the fragile crown.
Step 2: Upgrade your soil mix Because these ferns are epiphytes, they require excellent aeration around their roots. If your fern is in standard, heavy potting soil, consider repotting it. Blend a mix of regular potting soil, orchid bark, and perlite. This creates a chunky, well-draining environment that allows excess water to escape quickly.
Step 3: Ensure proper drainage Always keep your fern in a pot with drainage holes. If you love the look of a decorative pot without holes, simply keep the plant in its plastic nursery pot and use the decorative one as an outer "cachepot." Always empty any standing water from the cachepot after watering.
Step 4: Improve airflow and lighting Ensure your fern is placed in a spot with bright, indirect light and gentle air circulation. A room with a ceiling fan or an open window nearby will help evaporate any accidental moisture on the leaves before rot can set in.
Step 5: Treat early-stage rot (If necessary) If your fern is already showing early signs of crown rot, don't panic! Gently pluck out any completely mushy or dead leaves from the center to remove the decaying organic matter. Stop watering immediately and let the soil dry out. You can lightly apply a copper-based, plant-safe fungicide to the crown to halt the spread of the pathogens. With a little time and patience, your plant can bounce back!
Remember, plant care is a learning journey, and every challenge makes you a better plant parent. If you want to take the guesswork out of your plant care routine, log your Bird's Nest Fern into the Plantiary app. You can set up smart watering reminders tailored to your plant's specific needs, ensuring your fern stays perfectly hydrated and free of crown rot!